S가 T의 하위 유형이면 프로그램에서 자료형 T의 객체는 해당 프로그램의 원하는 속성을 변경하지 않고 자료형 S의 객체로 교체(치환)할 수 있어야 한다.
리스코프 치환 원칙이란 부모 객체와 자식 객체가 있을 때 부모 객체를 호출하는 동작에서 자식 객체가 부모 객체를 완전히 대체할 수 있다는 원칙이다.
OOP에서 상속이 일어나면, 하위 타입인 자식 객체는 상위 타입인 부모 객체의 특성을 가지며, 그 특성을 토대로 확장할 수 있다.
리스코프 치환 원칙은 올바른 상속을 위해, 자식 객체의 확장이 부모 객체의 방향을 온전히 따르도록 권고하는 원칙이다.
LSP를 위반한 예제 코드
직사각형, 정사각형 관계를 코드로 보자
public class Rectangle {

    public int width;
    public int height;

    // 너비 반환, Width Getter
    public int getWidth() {
        return width;
    }
    // 너비 할당, Width Setter
    public void setWidth(int width) {
        this.width = width;
    }

    // 높이 반환, Height Getter
    public int getHeight() {
        return height;
    }
    // 높이 할당, Height Setter
    public void setHeight(int height) {
        this.height = height;
    }

    //직사각형 넓이 반환 함수
    public int getArea() {
        return width * height;
    }
}

public class Square extends Rectangle{
    @Override
    public void setWidth(int Width) {
        super.setWidth(width);
        super.setHeight(getWidth());
    }

    @Override
    public void setHeight(int height) {
        super.setHeight(height);
        super.setWidth(getHeight());
    }
}
Rectangle 객체를 상속 받은 Square 클래스에서는 정사각형의 너비와 높이가 같다는 특징을 구현했다. 너비와 높이 둘 중 하나를 입력해도 나머지 값이 일치되도록 메서드를 override 해주었다.
아래는 Rectangle 클래스이다. 높이를 5, 너비를 10으로 설정했다.
public class Main {
    public static void main(String[] args) {

        Rectangle rectangle = new Rectangle();
        rectangle.setHeight(5);
        rectangle.setWidth(10);

        System.out.println(rectangle.getArea()); // 50
    }
}
다음은 Square 테스트이다.
리스코프 치환 원칙은 부모 객체를 호출하는 동작에서 자식 객체가 부모 객체를 완전히 대체할 수 있다는 원칙이다.
그렇다면 Rectangle 클래스에서의 테스트와 같은 값을 할당했을 때, 당연히 완전히 같은 결과를 반환해야 한다.
public class Main {
    public static void main(String[] args) {

        Rectangle square = new Square();

        square.setWidth(10);
        square.setHeight(5);


        System.out.println(square.getArea()); // 25
    }
}
아래는 50이 아니라 25가 반환되었다. 가장 마지막에 수행된 setHeight(5)가 객체의 너비와 높이를 모두 5로 할당했기에 25가 나오는 것은 당연하다.
위의 코드 둘다 Rectangle 자료형으로 인스턴스를 받고 있다. 하지만 Rectangle과 Square 클래스의 동작이 전혀 다르다는 사실을 알 수 있다.
이는 바로 정사각형이 직사각형을 상속 받는 것이 올바른 상속 관계가 아니라는 것을 의미한다. 자식 객체가 부모 객체의 역할을 완전히 대체하지 못한다는 의미이다.
이렇게 잘못된 객체를 상속하거나 올바르게 확장하지 못할 경우, 겉으로 보기엔 정상적이지만 올바른 객체라고 할 수는 없다.
위 같은 코드가 리스코프 치환 원칙을 위배하는 코드이다.
LSP를 준수한 코드
올바르게 성립하는 상속 관계를 구현한 코드이다.
public class Shape {

    public int width;
    public int height;

    // 너비 반환, Width Getter
    public int getWidth() {
        return width;
    }
    // 너비 할당, Width Setter
    public void setWidth(int width) {
        this.width = width;
    }

    // 높이 반환, Height Getter
    public int getHeight() {
        return height;
    }
    // 높이 할당, Height Setter
    public void setHeight(int height) {
        this.height = height;
    }

    // 사각형 넓이 반환
    public int getArea() {
        return width * height;
    }
}

//직사각형 클래스
public class Rectangle extends Shape {

    public Rectangle(int width, int height) {
        setWidth(width);
        setHeight(height);
    }
}

//정사각형 클래스
public class Square extends Shape{

    public Square(int length) {
        setWidth(length);
        setHeight(length);
    }
}

public class Main {
    public static void main(String[] args) {

        Shape rectangle = new Rectangle(10, 5);
        Shape square = new Square(5);

        System.out.println(rectangle.getArea()); // 50
        System.out.println(square.getArea()); // 25
    }
}
정리
리스코프 치환 원칙은 상속되는 객체는 반드시 부모 객체를 완전히 대체할 수 있어야 한다고 권고한다.
첫 번째의 직사각형 클래스를 상속받은 정사각형 객체 예제처럼, 올바르지 못한 상속관계는 제거하고 부모 객체의 동작을 완벽히 대체할 수 있는 관계만 상속하도록 코드를 설계해야 한다.
RxJS는 Reactive Extensions For JavaScript 의 약자로 reactive programming을 JS에서 지원하기 위해 만들어진 라이브러리다.
reactive programming: 데이터의 흐름과 변화에 반응하는 프로그래밍 패러다임이다.
이 패러다임은 데이터의 변화를 이벤트로 간주하고, 이러한 이벤트에 대한 반응을 정의함으로써 시스템을 구축한다.
특히 비동기적인 데이터 스트림을 처리하는 데 유용하며, 주로 사용자 인터페이스, 실시간 데이터 처리, 비동기 IO 작업 등에 적용된다.
이 리액티브 프로그래밍은 Push 시나리오 방식으로 외부와 통신한다.
Push 시나리오: 외부에서 명령하면서 응답이 오면 그때 반응하여 처리한다.
    데이터를 가지고 오기 위해서는 subscribe를 해야한다.
RxJS는 이러한 비동기 이벤트 기반의 프로그램 작성을 돕기 위해 함수형 프로그래밍을 이용해 이벤트 스트림을 Observable이라는 객체로 표현한다.
Observable은 event가 흐르는 stream이다. Observable은 누군가 구독(subscribe)을 해야 event를 발행(publish)한다. Observer가 Observable을 구독하면서 next, error, complete 키워드를 사용해 Observable에 흐르는 event를 처리한다.
const observable$ = interval(1000).pipe(take(4));
Observable 변수에 붙은 $(달러) 표시는 Observable을 나타내는 코드 컨벤션이다. interval()은 정의된 시간마다 증가하는 연속값을 stream에 발생시키고, pipe() operator를 사용하여 Observable stream 내부에서 적용할 operator를 처리하게 된다. take는 발생시킨 이벤트 중 처음부터 n개까지의 이벤트만 받는다.
ReactX는 크게 세 요소로 구성된다.
Observable: 일련의 값들을 발행한다. 관찰될 수 있는 것, 관찰되는 대상이란 뜻. 아래의 코드에서는 1에서 20까지의 정수를 반환한다. 이렇게 연속적으로 발행되어 나오는 값들을 흐름, stream이라고 부른다.
Operator: 순수 함수들의 모임
Observer: 파이프만 쳐다보며 값을 기다리다가 뭔가 나오는 대로 최종 작업을 시행한다. 옵저버가 파이프를 주시하며 발행물을 기다리는 것을 ReactiveX에서는 subscribe, 구독한다고 표현한다. 구독자가 발행물들에 '반응'하는 것 이다.
Operator Operator는 Observable에서 각 이벤트들에 대해 연산을 할 수 있는 pure function이다. 앞서 언급한 것처럼, RxJS는 함수형 프로그래밍에 영향을 많이 받아 이러한 pure function들이 많이 존재한다. 대표적으로 tap(), filter(), min(), max()와 같은 operator가 존재한다.
tab(): 데이터 스트림의 요소에 대해 부수적인 작업을 수행할 때 사용된다. 스트림의 요소를 변경하지 않고, 디버깅이나 로깅 등에 유용하다.
import { of } from 'rxjs';
import { tap } from 'rxjs/operators';

// of : RxJS에서 제공하는 함수로, 주어진 인수들을 순차적으로 방출하는 Observable을 생성한다.
of(1, 2, 3).pipe(
tap(x => console.log(`Tapped: ${x}`))
).subscribe();
filter(): 조건을 만족하는 요소만 스트림에 남겨둔다. 스트림의 각 요소에 대해 조건을 평가하여 true인 경우만 방출
import { of } from 'rxjs';
import { filter } from 'rxjs/operators';

of(1, 2, 3, 4).pipe(
  filter(x => x % 2 === 0)
).subscribe(console.log); // 2, 4
min(): 스트림에서 최소값을 찾는다. 스트림의 모든 요소를 비교하여 가장 작은 값을 방출
 import { of } from 'rxjs';
 import { min } from 'rxjs/operators';

 of(5, 3, 9, 1).pipe(
   min()
 ).subscribe(console.log); // 1
max(): 스트림에서 최대값을 찾는다. 스트림의 모든 요소를 비교하여 가장 큰 값을 방출
   import { of } from 'rxjs';
   import { max } from 'rxjs/operators';

   of(5, 3, 9, 1).pipe(
     max()
   ).subscribe(console.log); // 9
Observer Observer는 Observable을 구독하는 대상이다. Observer를 정의하고 next, error, complete 세 가지를 정의해 주고 Observable에 구독을 하면 완성이다.
  import {fromEvent} from 'rxjs'

  // fromEvent를 이용해서 이벤트를 observable 객체로 만든다.
  // dom 요소와 click과 같은 이벤트
  const observable = fromEvent(document, 'click');
  // subscriber(이벤트핸들러)를 정의
  const subscriber = () => console.log('Clicked!');
  // observable가 subscribe를 사용해 이벤트 핸들러인 subscriber을 구독하도록 한다.
  observable.subscribe(subscriber)
Observable Observable 객체는 특정 객체를 관찰하는 이벤트 핸들러인 Subscriber에게 여러 이벤트나 값을 보내는 역할을 한다.
아래의 코드는 RxJS의 Observable을 직접 생성하고 구독하는 예제이다.
observable이 subscriber에게 연속으로 1,2,3을 방출하고 1초 후에 4를 방출하도록 되어있다.

```javascript
    const observable = new Observable(subscriber => {
    subscriber.next(1)
    subscriber.next(2)
    subscriber.next(3)
    setTimeout(() => {
      subscriber.next(4)
      subscriber.complete() // 스트림을 완료한다.
    }, 1000)
  })

   // 1.
  console.log('just before subscribe')
  observable.subscribe({
    next(x) { // 새로운 값이 방출될 때 마다 호출된다.
      // 2.
      console.log('got value ' + x)
    },
    error(err) {
      console.error('something wrong occurred: ' + err)
    },
    complete() { // 스트림이 완료될 때 호출된다.
      // 4
      console.log('done')
    },
  })
    // 3
  console.log('just after subscribe')
```
간단하게 프로그래밍의 스타일을 뜻한다. 프로그램은 순차, 분기, 반복, 참조로 구성되는데 이를 어떤 관점(스타일)을 중심적으로 설계하느냐에 따라 패러다임의 종류가 나뉜다. 다시 말하면, 프로그래밍 패러다임은 개발자로 하여금 프로그래밍을 할 때 관점을 제시해주는 역할을 한다.
현재 프로그래밍 패러다임은 많은 종류가 있다. 크게 명령형과 선언형 프로그래밍으로 나뉜다.
명령형 프로그래밍은 컴퓨터에 문제를 어떻게 해결하는지 명령을 내리는 방식으로, 대표적으로 절차지향 프로그래밍과 객체지향 프로그래밍이 있다.
선언형(함수형) 프로그래밍은 컴퓨터에게 무엇을 해야하는지를 선언해주는 방식으로, 함수형에서 어떻게 해결하는지를 설명한 방법을 변수에 담을 수 있기 때문에 그 방법이 담긴 변수만 무엇인지만 명시해주면 된다.
절차지향 프로그래밍(Procedural Programming)
절차지향(절차적) 프로그래밍이란 프로그램을 함수나 절차의 집합으로 구성하는 패러다임이다. 일련의 명령문을 순차적으로 실행하는 방식으로 프로그램을 작성한다.
def add(a, b):
    return a + b

def subtract(a, b):
    return a - b

def main():
    x = 10
    y = 5
    print("Add:", add(x, y))        # Add: 15
    print("Subtract:", subtract(x, y))  # Subtract: 5

if __name__ == "__main__":
    main()
함수 호출 중심이란 전체 로직에서 재사용성이 높은(재사용이 가능한) 코드들을 별도의 함수로 분리하여 필요할 때마다 해당 함수를 호출하는 방식의 프로그래밍을 뜻한다.
TOP-DOWN 방식의 프로그래밍이다. 이러한 방식은 추상적인 개념을 구체화해 나아가는 방식이다. 예를 들어 *"핸드폰으로 사진을 찍는다"* 라는 추상적인 상황을 *"카메라 앱을 선택한다" -> "원하는 모드를 선택한다." -> "초점을 맞춘다" -> "셔터와 버튼을 누른다"* 와 같이 구체화해 나아가는 방식을 말한다.
절차지향 프로그래밍에서는 Main 함수가 하나의 큰 개념이라고 보면, 그 안에서 함수를 호출하고, 조건문을 사용하는 등을 통해서 개념을 구체화해 나간다.
절차지향 프로그래밍은 순차적으로 함수를 불러오기 때문에 함수의 역할만 알면 전반적인 프로그램의 목적을 이해하기 쉽다. 반대로 프로그램이 복잡해질수록 함수가 많아지지만 데이터는 main에서 관리하므로 프로그램의 방향성을 이해하기 어려워지며 유지보수도 어려워진다.
객체 지향 프로그래밍(Object-Oriented Programming, OOP)
객체지향 프로그래밍이란 객체를 최소 단위로 두며 이 객체에 책임을 명확히 해 각각 객체끼리 상호작용을 하도록 설계하는 프로그래밍 패러다임이다. 절차지향에서 처럼 main에서 프로그램의 진행을 다루는 것이 아니라 모든 것을 객체라고 생각하고 객체끼리의 상호관계를 통해서 일을 처리하는 방식이다.
 class Animal:
    def __init__(self, name):
        self.name = name

    def speak(self):
        raise NotImplementedError("Subclass must implement this method")

class Dog(Animal):
    def speak(self):
        return f"{self.name} says Woof!"

class Cat(Animal):
    def speak(self):
        return f"{self.name} says Meow!"

dog = Dog("Buddy")
cat = Cat("Whiskers")

print(dog.speak())  # Buddy says Woof!
print(cat.speak())  # Whiskers says Meow!
절차지향과 다르게 객체지향 프로그래밍은 각각의 객체마다 각각의 데이터와 메소드(함수)를 가지고 있다. 각각의 데이터와 메소드(함수)는 경우에 따라 외부에서 접근할 수 있기도 하며 보호되기도 한다.
프로그래밍은 전체적으로 객체와 객체 간의 메서드 호출로 이루어진다. 그리고 각 객체는 자신의 기능을 수행하는데 필요한 데이터를 직접 가지고 있다.
객체지향 프로그래밍은 다형성, 의존성 주입 등의 특징으로 코드를 쉽게 확장시킬 수 있어 여럿이서 협력할 때 사용하기에 좋다.
객체지향 프로그래밍은 직관적이며, 유지보수가 쉽다. 반면에 객체에 대한 이해가 없다면 코드를 이해하기 어려울 수 있다. 왜냐하면 입력에 따라서 다양한 작업으로 진행되기 때문이다.
주요 특징
클래스와 객체: 클래스는 객체의 청사진이며 객체는 클래스의 인스턴스이다.
캡슐화: 객체의 상태를 보호하고, 객체의 내부 구현을 숨기는 것을 의미한다.
상속: 새로운 클래스가 기존 클래스의 특성과 행동을 재사용할 수 있도록 한다.
다형성: 동일한 인터페이스를 사용하여 서로 다른 데이터 타입을 처리할 수 있다.
함수형 프로그래밍(Functional Programming)
함수형 프로그래밍은 함수가 최소 단위이며 외부 상태를 갖지 않는 함수들을 통해 파이프 형태로 프로그래밍을 하는 패러다임이다. 또한 함수형 프로그래밍은 모든 데이터의 처리를 수학적 함수로 취급하여 결과 값을 구하는 방식의 프로그래밍이다.
여기서 외부 상태를 갖지 않는다는 의미는 같은 입력을 넣었을 때 언제나 같은 출력을 내보낸다는 것이다. 다시 말하면 어떤 외부 요인도 함수의 입출력에는 영향을 주지 않는 다는 것이다. 통제하지 못하는 외부 상태를 사용한다면 예측하지 못하는 부작용을 가질 수 있기에 외부 상태를 수정할 수 없도록 하는 것이 중요하다.
// 순수 함수: 동일한 입력에 대해 항상 동일한 출력을 반환
const add = (a, b) => a + b;

// 고차 함수: 함수를 인수로 받거나 함수를 반환하는 함수
const applyFunction = (f, x, y) => f(x, y);

// 불변성: 데이터가 변경되지 않으며, 데이터 변경 시 새로운 데이터를 생성한다.
const originalArray = [1, 2, 3];
const newArray = [...originalArray, 4];

// 합성: 작은 함수를 조합하여 복잡한 연산을 구성
const increment = x => x + 1;
const double = x => x * 2;

const incrementAndDouble = x => double(increment(x));

console.log(applyFunction(add, 10, 5));  // 15
console.log(originalArray);  // [1, 2, 3]
console.log(newArray);  // [1, 2, 3, 4]
console.log(incrementAndDouble(2));  // 6
함수형 프로그래밍 코드에서는 한 번 초기화한 객체 및 변수는 변하지 않는다. 이러한 특성을 불변성이라고 하는데, 이 불변성 때문에 프로그램의 동작을 예측하기 쉽고 프로그램의 데이터 흐름이 유지될 수 있다.
함수형 프로그래밍은 주어진 문제를 잘게 쪼개 그 문제를 해결하는 함수를 만들고 그 함수들을 결합하는 방식으로 문제를 해결해 나간다.
외부 상태로 인한 부작용이 없기에 안정적이다. 그러므로 동시성을 가지는 프로그램(대용량 데이터를 병렬적으로 처리하는 경우)에 사용하기 적합하다. 하지만 온전히 함수형 프로그래밍으로 구성하기 위해선 정말 다양한 함수들을 조합해 사용해야 한다는 단점이 있다.
반응형 프로그래밍(Reactive Programming)
비동기 데이터 흐름에 기반을 둔 프로그래밍 패러다임으로, 데이터 중심 사고 방식인 프로그래밍이다. 이벤트나 변화에 반응하기 위한 비동기적 데이터 처리 및 흐름 기반 프로그래밍 패러다임이다. 이것은 프로그래밍 언어로 정적 또는 동적인 데이터 흐름을 쉽게 표현할 수 있어야하며, 데이터 흐름을 통해 하부 실행 모델이 자동으로 변화를 전파할 수 있다는 것을 의미한다.
데이터와 데이터 스트림에 영향을 미치는 모든 변경 사항을 관련된 모든 당사자들에게 전파하는, 모든 프로그램을 reactive 프로그램이라고 할 수 있다. 다음과 같은 이점이 있다.
간결해진 thread 사용
간단한 비동기 연산
콜백 지옥의 제거
반응형 프로그래밍을 가장 쉽게 이해할 수 있는 예1.
| - | A | B |C |D | |---|---|---| | 1열 | 1 | 2 |=A1+B1 |=A1+B1+C1 |
C와 D 열에는 수식을 선언적으로 작성해 둔다.
A1, B1의 값을 변경하면 즉시 변경사항이 전파 -> C1의 값이 자동으로 변경됨
C1이 변경되자, D1에도 수식이 반영되어 값이 변경됨
어떤 순서로 데이터가 변경되어야 하는지 정해주지 않았음에도 하나의 데이터의 흐름이 만들어짐
예2.
// 명령형 프로그래밍 - 결과값이 저장
int a=10, b=20;
int c = a+b;
System.out.println(c)); // c = 30;
a = 20;
System.out.println(c)); // c = 30; c에 계산식의 결과값 30만 저장됨

// 반응형 프로그래밍 - 계산식이 저장
int a=10, b=20;
int c = a+b;
System.out.println(c)); // c = 30;
a = 20;
System.out.println(c)); // c = 40; c에 계산식 자체가 저장되어 사용하는 변수 a의 값이 바뀐 것이 반영됨
OOP와 다르게 데이터의 흐름에 더 집중한다. 이 데이터 흐름은 관찰할 수 있거나 필터링하거나 다룰 수 있으며 새로운 흐름을 만들기 위해 다른 흐름과 병합할 수도 있다.
직접 재계산명령이 필요없다. 변수 값을 바꾸면 해당 변수를 참조하는 모든 식들이 연쇄적으로 재평가되면서 스스로의 값을 갱신한다.
this를 binding한다. 이 말이 무슨 뜻일까? javascript의 함수는 각자 자신만의 this라는 것을 정의한다. 예를 들어 자기소개를 하는 함수를 위해 say()이라는 함수를 만든다고 하자.
const say = function(){
    console.log(this);
      console.log("Hello, my name is" + this.name);
}

say();
실행결과는 다음과 같다.
window객체가 나타난다. 기본적으로 this는 window이기 때문이다. 하지만 무조건적으로 window라고 볼 수는 없다. this는 객체 내부, 객체 메서드 호출 시, 생성자 new 호출 시, 명시적 bind 시에 따라 바뀌기 때문이다.
this의 binding을 통해서 this를 원하는, 알맞은 객체로 바꿔줄 수 있다. 명시적으로 위의 this를 window가 아닌 다른 객체로 바꿔주는 함수가 call, apply, bind이다.
call과 apply
원래 함수는 선언한 후 호출해야 실행된다. 호출하는 방법으로는 함수 뒤에 ()를 붙이는 것, 그리고 call과 apply하는 방법이 있다.
다음은 say 함수이다.
cosnt say = function(city){
    console.log(`Hello, my name is ${this.name}, I live in ${city}`);
}

const obj = {name:"Tom"};

say("seoul"); // Hello, my name is , I live in seoul
say.call(obj, "seoul"); // Hello, my name is Tom, I live in seoul
say.apply(obj, ["seoul"]); // Hello, my name is Tom, I live in seoul
call과 apply는 함수를 호출하는 함수이다. 첫 번째 인자에 this로 설정하고 싶은 객체를 넘겨주어 this를 바꾸고나서 실행한다.
첫 번째 실행의 경우 this에 아무런 setting이 되어있지 않으므로, this는 window 객체이다. 두 번째, 세 번째 실행의 경우 this를 obj로 변경시켰으므로 원하는 값이 나온다.
call과 apply의 첫 번째, this를 binding할 값을, 나머지에는 실제 say에 필요한 parameter를 입력하는 방식이다. call과는 다르게 apply함수는 두 번째 인자부터 모두 배열에 넣어야 한다.
또 다른 예이다.
var obj = {
  string: 'zero',
  yell: function() {
    console.log(this.string);
  }
};
var obj2 = {
  string: 'what'
};

obj.yell(); // 'zero';
obj.yell.call(obj2); // 'what', obj1.yell()을 obj2.yell()로 바꾼 효과라고 보면 된다
obj.yell.apply(obj2); // 'what'
위의 코드의 obj.yell.call(obj2)로 this가 가리키는 것을 obj에서 obj2로 바꾸었다.
yell은 obj의 method임에도 불구하고 zero 대신 what으로 변경되었다.
즉 call을 써서 this를 정의해준다면 다른 객체의 parameter나 method를 자기 것마냥 사용할 수 있다.
<팁!>
.call(this, paramter1, parameter2, ...)
.apply(this, [paramter1, parameter2, ...])
bind
bind 함수가 call, apply와 다른 점은 함수를 실행하지 않는다는 점이다. 대신 bound 함수를 리턴한다. 이 bound 함수는 this를 설정한 함수이다. 또한 함수에 argument를 넣어 줄 수 있다.
const obj = {name: "nanana"};

const say = function(city){
    console.log(`Hello, my name is ${this.name}, I live in ${city}`);
}

const boundSay = say.bind(obj);
const boundSayTwo = say.bind(obj,"busan");

boundSay("seoul");
boundSayTwo();
call, apply, bind 정리
call, apply, bind는 함수 호출 방법을 지정해서 this를 그때 그때 알맞은 객체로 명시적으로 바꿔주는 메소드이다.
Nest decorator로 불리는 language feature로 build 됬다. Decorator는 programming language에서 흔히 사용되는 개념이다. 하지만 Javascript 세상에서는, 여전히 상대적으로 새로운 개념이다. 어떻게 decorator가 작동하는지 더 이해하기 위해서는, 다음을 기사를 추천한다.
ES2016 decorator는 함수를 반환하는 표현식이며, 대상, 이름, 속성 기술자를 인수로 받을 수 있다. 데코레이터를 적용하려면 데코레이터 앞에 '@' 문자를 붙이고 데코레이팅하려는 것의 맨 위에 배치한다. decorator는 class, method 또는 property를 위해 정의될 수 있다.
Param decorators
Nest는 HTTP route handler와 함께 사용할 수 있는 유용한 param decorator를 제공한다. 아래는 제공되는 Express, Fastify 객체를 쉽게 다를 수 있게 해주는 데코레이터 리스트이다.
@Decorator
object
description
@Reqeust(), @Req()
req
전체 요청 객체(req)를 주입한다.
@Response(), @Res()
res
전체 응답 객체(res)를 주입한다.
@Next()
next
next 함수를 주입한다. 미들웨어 함수에서 주로 사용된다.
@Session()
req.session
세션 객체를 주입한다.
@Param(param?: string)
req.params/ req.params[param]
URL 파라미터를 주입한다. param 인자를 제공하면 해당 파라미터의 값을 가져오고, 제공하지 않으면 모든 파라미터를 객체 형태로 가져온다
@Body(param?:string)
req.body/req.body[param]
요청 본문(body)을 주입한다. param 인자를 제공하면 해당 본문 필드의 값을 가져오고, 제공하지 않으면 본문을 객체 형태로 가져온다.
@Query(param?:string)
req.query/req.query[param]
쿼리 문자열을 주입한다. param 인자를 제공하면 해당 쿼리 파라미터의 값을 가져오고, 제공하지 않으면 모든 쿼리 파라미터를 객체 형태로 가져온다.
@Headers(param?:string)
req.headers/req.headers[param]
요청 헤더를 주입한다. param 인자를 제공하면 해당 헤더의 값을 가져오고, 제공하지 않으면 모든 헤드를 객체 형태로 가져온다.
@Ip()
req.ip
요청의 IP주소를 주입한다.
@Query
req.hosts
호스트 파라미터를 주입한다. 이는 요청의 호스트 정보를 가져온다.
추가적으로, custom decorators를 만들 수 있다.
node.js에서는 속성(properties)를 request object에 붙이는게 흔한 관행이다. 이런 속성을 route handler에서 extract할 수 있다.
const user = req.user;
code를 좀 더 readable하고 transparent하게 만들기 위해, @User() decorator를 만들고, 이를 controller 전반에 걸쳐 재사용할 수 있다.
만일 decorator의 기능이 조건적으로 이루어져야 한다면, 'data' 매개변수를 사용하여 데코레이터의 팩토리 함수에 인수를 전달할 수 있다. custom decorator를 사용하면 request object에서 특정 key에 해당하는 속성을 추출하여 route handler method에 주입할 수 있다. 이를 통해 코드의 가독성과 재사용성을 높일 수 있다. 예를 들어 authentication layer request의 유효성을 검사한다. 그리고 user entity에 request object를 붙인다. authenticated request의 user entity는 다음과 같을 것 이다.
name을 key로 갖는 decorator를 정의해보자. 이는 만일 존재한다면 관련된 value를 반환한다.(만일 존재하지 않거나 user object가 만들어져 있지 않다면 undefined를 반환한다.)
// user.decorator.ts
import { createParamDecorator, ExecutionContext } from '@nestjs/common';

export const User = createParamDecorator(
  (data: string, ctx: ExecutionContext) => {
    const request = ctx.switchToHttp().getRequest();
    const user = request.user;

    // user에서 data에 해당하는 정보가 있다면 그것을 반환
    // 그렇지 data가 지정되지 않았다면 user 객체를 반환
    return data ? user?.[data] : user;
  },
);

// 사용
import { Controller, Get } from '@nestjs/common';
import { User } from './user.decorator'; // 경로는 실제 파일 위치에 따라 다릅니다.

@Controller('profile')
export class ProfileController {
  @Get()
  getProfile(@User() user: any) {
    // 전체 사용자 객체 반환
    console.log(user);
    return user;
  }

  @Get('email')
  getUserEmail(@User('email') email: string) {
    // 사용자 이름만 반환
    console.log(email);
    return email;
  }
}
controller에서 @User() decorator를 통해 어떻게 특정한 property에 접근하는가?
위의 같은 decorator, 허나 다른 key로 다른 property에 접근할 수 있다. 사용자 객체가 깊거나 복잡한 경우, 이 방법을 통해 request handler 구현을 더 쉽게 만들고 가독성을 높일 수 있다.
<팁!> Typescript 사용자는 createParamDecorator()가 제네릭이라는 점에 주목해야 한다.이를 통해 타입 안전성을 명시적으로 보장할 수 있다. (e.g. createParamDecorator((data, ctx)=> ... )) 또는 factory function에서 매개변수 타입을 지정할 수도 있다. (e.g. createParamDecorator((data:string, ctx)=> ...)) 만일 둘다 생략하면 data의 타입은 any이다.
factory function: 객체를 생성하는 함수. 객체의 생성과 초기화를 담당하며, 동일한 함수로 다양한 형태의 객체를 만들 수 있는 유연성을 제공한다.
Working with pipes
Nest는 기본 내장된 @Body(), @Param(), @Query()에서 처리하는 것과 같은 방식으로 custom param decorator를 처리한다. 이는 pipe는 custom annotated parameter에서도 실행된다는 걸 의미한다. (e.g. 위의 user argument ) 게다가, pipe를 바로 custom decorator에 apply할 수 있다. 그냥 custom decorator에도 pipe가 적용된다는 걸 뜻한다.
<팁!> validateCustomDecorator 옵션은 반드시 true로 설정되어야 한다. ValidationPipe는 default로 custom decorator로 주석이 달린 인수를 검증하지 않는다.
Decorator composition
Nest는 mutiple decorator를 구성할 수 있도록 helper method를 제공한다. 예를 들어, authentication과 관련된 모든 decorator를 하나의 decorator로 combine하기를 원한다고 하자. 이는 다음과 같은 구성으로 완료된다.
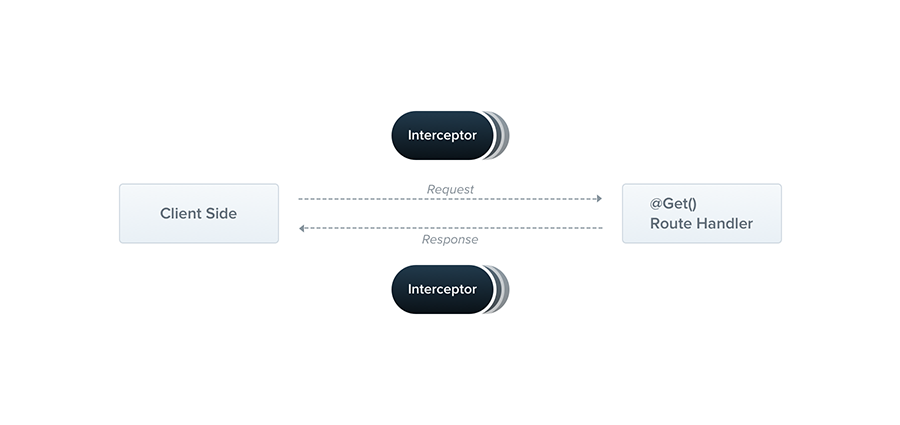
Interceptor는 NestInterceptor interface를 구현하고 @Injectable() decorator가 주석으로 달린 class이다.
Interceptor는 들어오는 요청(reqeust)와 나가는 응답(response)을 가로채고, 이들 사이에서 추가적인 로직을 실행할 수 있도록 하는 강력한 기능을 제공한다. 인터셉터는 다음과 같은 여러 용도로 사용될 수 있다.
    - 로깅(Logging): 요청 및 응답 정보를 기록
    - 변환(Transformation): 응답 데이터를 특정 형식으로 변환
    - 캐싱(Caching): 반복적인 요청에 대해 캐시된 응답을 제공한다.
    - 에러 처리(Error Handling): 특정한 에러를 처리하거나 에러 메시지를 변환한다.
    - 타이밍(Timing): 요청 처리 시간을 측정한다.
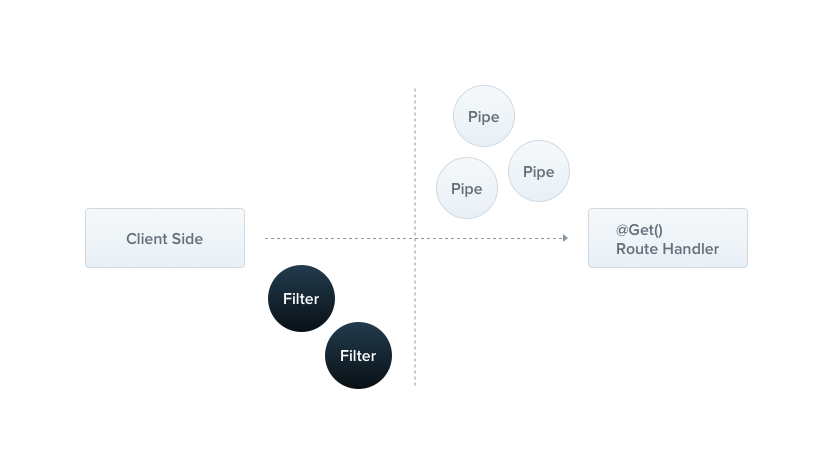
1. Middleware: 모든 미들웨어가 순차적으로 실행된다.
2. Guard: 요청을 처리할 수 있는지 확인하는 모든 가드가 실행된다.
3. Interceptor(전처리): 요청 전처리를 수행하는 모든 인터셉터가 실행된다
4. Pipe: 입력 데이터의 변환 및 유효성 검사를 수행하는 모든 파이프가 실행된다.
5. Controller Handler: 컨트롤러의 핸들러 메서드가 실행된다.
6. Pipe(응답 데이터 변환): 컨트롤러 핸들러가 반환한 데이터를 변환하는 파이프가 있을 경우 실행된다.
7. Interceptor(후처리): 요청 후처리를 수행하는 모든 인터셉터가 실행된다.
AOP: OOP와 같은 방식으로 소프트웨어 모듈화를 목표로 하는 프로그래밍 패러다임이다. 주로 관심사의 분리(Separation of Concerns)를 통해 코드의 재사용성과 유지보수성을 높이는 데 중점을 둔다.
method 실행의 전, 후 로직을 묶는다.
function으로 부터 반환된 result를 바꿈
function으로 부터 던져진 exception을 바꿈
basic fucntion들의 기능 추가
특정 조건에 따라 function을 override 하는 것
Basics
각 interceptor는 intercept() method를 구현한다. 이는 두 개의 argument를 받는다. (ExecutionContext, CallHandler) ExecutionContext의 instance이다.(Guards에서의 object과 동일하다.) ExecutionContext는 ArgumentsHost를 상속받는다. 이전의 exception filter chapter에서 ArgumentHost를 살펴보았다. 이것은 original handler에 전달된 arguments들의 wrapper이며, application의 type에 따라 다양한 arguments array를 포함하고 있음을 보았다. 자세한 사항은 exception filters 살펴봐라.
ArgumentHost: 원래 handler에 전달된 argument를 래핑하는 객체로, 어플리케이션의 타입에 따라 다양한 인수 배열을 포함한다.
        이를 통해, request handler에 전달된 모든 인수를 쉽게 접근할 수 있다.
    1. getArgs() : 원래의 핸들러에 전달된 모드 인수 배열을 반환
    2. getArgByIndex(index:number): 특정 인덱스의 인수를 반환
    3. switchToHttp(): Http 컨텍스트로 전환하여 HTTP 요청 및 응답 객체에 접근할 수 있다.
    4. swtichToWs(): WebSocket 컨텍스트로 전환하여 WebSocket 요청 및 응답 객체에 접근할 수 있다.
ExecutionContext: 'ArgumentsHost'를 확장한 인터페이스로, 주로 가드와 인터셉터에서 사용된다.
    1. getClass(): 현재 처리 중인 클래스(controller)를 반환한다.
    2. getHandler(): 현재 처리 중인 핸들러(method)를 반환한다.
    3. getType(): 현재 실행 컨텍스트의 유형을 반환한다.(HTTP, RPC, WebSocket)


ArgumentHost와 ExecutionContext의 주요 정보
1. HTTP 컨텍스트(Express 사용 시)
    - Request: Express의 요청 객체로, 요청된 URL, 헤더, 본문, 쿼리 파라미터 등을 포함한다.
    - Response: Express의 응답 객체로, 응답을 작성하고 반환하는데 사용된다.
    - Next: (옵션) 미들웨어 체인의 다음 함수로, 일반적으로 사용은 안됨
2. 메서드 및 클래스 정보
    - Handler: 현재 실행 중인 핸들러 메서드
    - Class: 현재 실행 중인 클래스(컨트롤러)
Execution context
ArgumentsHost, ExecutionContext를 extending함으로써 현재 execution process에 대해 추가정보를 제공하는 새로운 helper method들을 추가할 수 있다. 이러한 정보들은 controller, method, execution context를 걸쳐 좀더 generic interceptor를 build하는데 도움된다. ExecutionContext
Call handler
NestJs에서의 interceptor는 request를 가로채어 특정 로직을 실행할 수 있다. 인터셉터의 intercept() method는 두 개의 인자를 받는다. ExecutionContext와 CallHandler. CallHandler의 'handle()' method는 rotue handler method를 호출하는 데 사용된다. 만약 handle() method를 호출하지 않으면, request가 route handler로 전달되지 않고, 해당 route handler method는 실행되지 않는다.
이러한 접근은 intercept() method는 효과적으로 request/response streamdmf 감싼다. 결과대로, 마지막 route handler의 실행 전/후 둘다 custom logic를 실행할 것 이다. intercept() method가 handle() 이 호출되기 전에 실행된다. 하지만 후에 어떻게 영향을 주는가? handle() method가 Observable를 return 하기 때문에, 우리는 강력한 RxJS operator를 사용하여 response를 조작할 수 있다. Aspect Oriented Programming 기술을 사용하면, route handler의 호출(즉, handle() 호출)은 Pointcut이라고 하며 이 지점에서 추가 로직이 삽입 된다.
RxJS: 이벤트나 비동기, 시간을 마치 Array 처럼 다룰 수 있게 만들어 주는 라이브러리
예를 들어, POST /cats request가 들어온다고 가정하자. request는 CatsController안에 정의된 create() handler method로 향할 것이다. interceptor가 handle() method를 호출하지 않으면, 그 경로상의 어느 곳에서든 create() method가 실행되지 않을 것 이다. 한번 handle()이 호출되면(이는 Observable을 반환할 것 이다.) create() handler가 트리거된다. 그리고 Observable를 통해 응답 스트림이 수신되면, 그 스트림에 추가 작업을 수행하고 최종 결과를 호출자에게 반환할 수 있다.
Aspect interception
NestJs에서 인터셉터를 사용하여 사용자 상호작용을 logging 할 수 있다. 예를 들어, 사용자의 호출을 저장하거나, 비동기적으로 이벤트를 디스패치하거나, 타임스탬프를 계산할 수 있다. 아래는 간단한 LoggingInterceptor이다.
import { Injectable, NestInterceptor, ExecutionContext, CallHandler } from '@nestjs/common';
import { Observable } from 'rxjs';
import { tap } from 'rxjs/operators';

// pipe
// RxJS의 주요 연산자 중 하나로, Observable의 데이터를 처리하기 위해 다양한 연산자를 연결
// 할 수 있는 메서드이다. pipe를 사용하면 데이터를 변환하거나, 필터링하거나, 부수 효과를 추가하는
// 등의 작업을 체인 방식으로 적용할 수 있다.

// tap
// RxJS의 연산자 중 하나로, Observable 데이터 스트림을 변경하지 않고, 부수 효과(side effect)를 추가
// 할 수 있게 해준다. 주로 디버깅, 로깅, 데이터 수집 등의 목적으로 사용된다.
// tap 연산자는 스트림에 있는 각 데이터 항목에 대해 지정된 함수를 호출한다.

@Injectable()
export class LoggingInterceptor implements NestInterceptor {
  intercept(context: ExecutionContext, next: CallHandler): Observable<any> {
    // route handler 전
    console.log('Before...');

    const now = Date.now();
    // next: CallHandler 인터페이스를 구현한 객체로, 실제 컨트롤러의 핸들러 메서드를 호출하는 handle method를 제공한다.
    // next.handle(): 핸들러 메서드를 호출하고, Observable을 반환한다.
    return next
      .handle()
    // route handler 후
      .pipe(
        tap(() => console.log(`After... ${Date.now() - now}ms`)),
      );
  }
}
<팁!>
NestInterceptor<T,R> 는 generic interface이다. T는 Observable<T>의 타입을 나타낸다. 요청 핸들러가 반환하는 데이터 스트림의 타입을 나타낸다. 즉, 라우트 핸들러 메서드가 반환하는 데이터 타입 이다. R는 Observable<R>에 의해 감싸진 값의 타입을 말한다. 인터셉터가 반환하는 최종 데이터 타입이다. 인터셉터가 응답 데이터를 어떻게 변형할지를 정의한다.
<주의사항!> interceptor는 controller, provider, guard와 동일하게 constructor를 통해 dependency를 inject한다.
handle() 은 RxJS Observable를 반환하기 때문에, 우리는 다양한 RxJS 연산자를 사용하여 stream을 조작할 수 있다. 이를 통해, response data에 추가적인 로직을 적용하거나, 데이터를 변환하고, 부수 효과를 추가할 수 있다. 위의 예에서 tab() 연산자를 사용했다. 이는 Observable 스트림이 정상적으로 완료되거나 예외가 발생할 때 익명 로깅 함수를 호출한다. 그러나 response cycle에는 영향을 미치지 않는다. 이는 주로 디버깅, 로깅, 또는 부수효과를 추가하는 용도로 사용된다.
Binding interceptor
interceptor를 설정하기 위해서는 @nestjs/common에서 @UseInterceptors() decorator를 사용한다. pipe, guards와 마찬가지로interceptor는 또한 controller, method, global scope로 설정할 수 있다.
@UseInterceptors(LoggingInterceptor)
export class CatsController {}
위의 구조로, CatsController안에 정의된 모든 route handler들은 LogginInterceptor를 사용할 수 있다. 만일 GET /cats endpoint가 호출된다면, 다음과 같은 output을 얻을 수 있다.
Before...
After... 1ms
instance가 아닌 LogginInterceptor class 를 전달했다. 이는 instantiation과 dependeny injection 책임을 framework에게 넘겨준다. pipe, guard, exception filter과 동일하게, 또한 instance를 넘겨줄 수 있다.
@UseInterceptors(new LoggingInterceptor())
export class CatsController {}
앞서 언급한 대로 위의 구조는 controller에 선언된 모든 handler에 interceptor를 붙인다. 만일 interceptor의 범위를 single method로 좁히고 싶다면, 간단히 method level로 적용하면 된다.
만일 global interceptor를 설정하고 싶다면, useGlobalInterceptors() method를 사용한다.
global interceptor는 모든 controller, route handler를 걸친 application에 사용된다. dependency injection면에서, 위의 예 처럼, useGlobalInterceptors()를 사용하여 module 바깥에서 등록된 global interceptor는 dependency를 inject할 수 없다. 왜냐하면 module의 외부에서 inject가 이루어 졌기 때문이다. 이러한 문제를 해결하기 위해서는 다음과 같은 구조로 interceptor를 module 에서 바로 설정하면 된다.
import { Module } from '@nestjs/common';
import { APP_INTERCEPTOR } from '@nestjs/core';

@Module({
  providers: [
    {
      provide: APP_INTERCEPTOR,
      useClass: LoggingInterceptor,
    },
  ],
})
export class AppModule {}
<팁!> 이 접근 방식을 사용하여 interceptor에 대한 dependency inject를 수행할 때, 이 구성이 사용되는 모듈에 관계없이 interceptor는 실제로 전역적임을 유의해야 한다. 이는 intercepter(위의 경우 LogginInterceptor)가 정의된 모듈을 선택해야 한다. 또한 'useClass'는 custome provider 등록을 처리하는 유일한 방법이 아니다. 자세히
Response mapping
handle() method는 Observable를 반환한다. stream에는 route handler에서 반환된 value를 포함한다. 그리고 즉, 이는 RxJS의 map() operator를 통해 쉽게 변경할 수 있다. map() 연산자는 Observable의 각 값을 변환하여 새로운 값으로 반환한다. 이를 통해 응답 데이터를 변형하거나 추가적인 로직을 적용할 수 있다.
<주의사항!> response mapping feature은 라이브러리별 response strategy(즉, '@Res() obejct를 직접 사용하는 것')와 함께 작동하지 않는다.
TransformInterceptor를 만들자. 이는 process를 보여주기 위해 각 response를 간단하게 변형한 것 이다. 이는 response object를 새롭게 만들어진 object의 data 속성에 할당하기 위해 RxJS의 map() 연산자를 사용할 것 이다. 이렇게 만들어진 object는 client에게 반환될 것 이다.
import { Injectable, NestInterceptor, ExecutionContext, CallHandler } from '@nestjs/common';
import { Observable } from 'rxjs';
import { map } from 'rxjs/operators';

// 응답 데이터의 구조를 정의
export interface Response<T> {
  data: T;
}

@Injectable()
//<T, Response<T>>
//    T: 인터셉터가 처리할 입력 데이터의 타입을 나타냄
//    Response<T>: 인터셉터가 반환할 출력 데이터의 타입을 나타냄
export class TransformInterceptor<T> implements NestInterceptor<T, Response<T>> {
  // context: 현재 실행 컨텍스트를 나타냄, 요청 및 응답 객체에 접근할 수 있다.
  // next: CallHandler 인터페이스를 구현한 객체로, 실제 컨트롤러의 핸들러 메서드를 호출하는 handle 메서드를 제공
  intercept(context: ExecutionContext, next: CallHandler): Observable<Response<T>> {
    return next.handle().pipe(map(data => ({ data })));
  }
}

// 사용
import { Controller, Get, UseInterceptors } from '@nestjs/common';
import { TransformInterceptor } from './transform.interceptor';

@Controller('cats')
@UseInterceptors(TransformInterceptor)
export class CatsController {
  @Get()
  findAll() {
    return [{ name: 'Tom' }, { name: 'Jerry' }];
  }
}
Nest 인터셉터는 동기와 비동기 모두에서 작동한다. 필요에 따라 메서드를 간단히 async로 변경할 수 있다.
위의 구조에서 만일 GET /cats endpoints로 호출했을 때, response는 다음과 같은 결과를 도출할 것 이다.
{
  "data": []
}
인터셉터는 어플리케이션 전체에서 발생하는 요구 사항에 대한 재사용 가능한 솔루션을 만드는데 큰 가치를 제공한다.
예를 들어, null값을 빈 문자열("")로 변환해야 한다고 가정해보자. 한 줄의 코드로 이를 수행할 수 있으며, 인터셉터를 전역적으로 바인딩하여 등록된 각 핸들러에서 자동으로 사용되도록 할 수 있다.
import { Injectable, NestInterceptor, ExecutionContext, CallHandler } from '@nestjs/common';
import { Observable } from 'rxjs';
import { map } from 'rxjs/operators';

@Injectable()
export class ExcludeNullInterceptor implements NestInterceptor {
  intercept(context: ExecutionContext, next: CallHandler): Observable<any> {
    return next
      .handle()
      .pipe(map(value => value === null ? '' : value ));
  }
}
Exception mapping
다른 RxJS의 catchError() 연산자는 thrown exception을 override할 수 있다.
import {
  Injectable,
  NestInterceptor,
  ExecutionContext,
  BadGatewayException,
  CallHandler,
} from '@nestjs/common';
import { Observable, throwError } from 'rxjs';
import { catchError } from 'rxjs/operators';

@Injectable()
export class ErrorsInterceptor implements NestInterceptor {
  intercept(context: ExecutionContext, next: CallHandler): Observable<any> {
    return next
      .handle()
      .pipe(
          // 핸들러 메서드에서 발생한 에러를 가로채고, 이를 BadGatewayException으로 변환
        catchError(err => throwError(() => new BadGatewayException())),
      );
  }
}
Stream overriding
때때로 완전히 handler의 호출을 막고, 대신에 다른 값을 반환하기를 원하는 이유가 몇 있다. 명백한 예는 response time을 항샹시키기 위해 cache를 구현하는 것 이다. 간단한 simple cache interceptor를 보자. 이는 cache로 부터 interceptor의 response를 반환한다. cache interceptor를 사용하면 response time을 개선하기 위해 cached data를 반환할 수 있다. cache interceptor는 request에 대한 response를 cache하고, 동일한 request가 들어올 때 cached된 데이터를 반환하여 서버의 부담을 줄일 수 있다. 현실적인 예로, 우리는 TTL, cache invalidation, cache size...와 같은 다른 요소들을 고려해야 하지만, 이는 이 논의의 범위를 벗어난다. 여기서 main concept에 를 보여주는 간단한 예시가 있다.
import { Injectable, NestInterceptor, ExecutionContext, CallHandler } from '@nestjs/common';
import { Observable, of } from 'rxjs';

@Injectable()
export class CacheInterceptor implements NestInterceptor {
  intercept(context: ExecutionContext, next: CallHandler): Observable<any> {
    const isCached = true;
    if (isCached) {
      return of([]);
    }
    return next.handle();
  }
}
위에서 CacheInterceptor는 하드코딩된 isCached 변수와 하드코딩된 [ ]을 가진다. 여기서 핵심 포인트는 RxJS의 of() 연산자로 인해 생성된 new stream을 반환하는 것 이다. 그러므로, route handler는 호출되지 않는다. 누군가 CacheInterceptor를 사용하는 endpoint를 호출하면, response(하드코딩된 빈 배열)이 즉시 반환된다. 일반적인 해결책으로는, Reflector를 사용하여 새로운 custom decorator을 만드는 것 이다. reflector
More operators
RxJS operator를 사용하여 stream을 조작하는 것은 많은 가능성을 제공해 준다. 흔한 use case를 생각해보자. 만일 route requests에서 timeouts를 handle하고 싶다고 하자. 만일 특정 시간이 지난 후에도, endpoint가 아무것도 반환하지 않으면 error response로 종료하고 싶을 수 있다. 다음 코드는 이러한 기능을 구현하는 방법을 보여준다.
import { Injectable, NestInterceptor, ExecutionContext, CallHandler, RequestTimeoutException } from '@nestjs/common';
import { Observable, throwError, TimeoutError } from 'rxjs';
import { catchError, timeout } from 'rxjs/operators';

@Injectable()
export class TimeoutInterceptor implements NestInterceptor {
  intercept(context: ExecutionContext, next: CallHandler): Observable<any> {
    return next.handle().pipe(
      // 요청이 5초 내에 완료되지 않으면 TimeoutError를 발생
      timeout(5000),
      catchError(err => {
        if (err instanceof TimeoutError) {
          return throwError(() => new RequestTimeoutException());
        }
        return throwError(() => err);
      }),
    );
  };
};
5초 후에, request processing은 취소될 것 이다. RequestTimeoutException이 던져지기 전에 custom logic또한 추가할 수 있다.
guard는 CanActivate interface를 implement하는 @Injectable() decorator이 붙은 class이다.
//Middleware
//    역할: 요청과 응답 사이의 모든 것을 처리. 주로 로깅, 인증, 요청 변환에 사용
//    적용: 모든 경로에 대해 전역적으로 적용되거나 특정 경로에 대해 적용될 수 있다.
//    순서: 요청 수신 직후 실행된다.
import { Injectable, NestMiddleware } from '@nestjs/common';
import { Request, Response, NextFunction } from 'express';

@Injectable()
export class LoggerMiddleware implements NestMiddleware {
  use(req: Request, res: Response, next: NextFunction) {
    console.log('Request...');
    next();
  }
}

//Guard
//    역할: 요청이 컨트롤러 핸들러로 들어가기 전에 특정 조건(주로 인증/권한)을 확인하고, 접근을 허용할지 결정한다.
//    적용: 전역, 컨트롤러, 또는 특정 핸들러에 대해 적용될 수 있다.
//    순서: 미들웨어 이후에 실행된다.
import { Injectable, CanActivate, ExecutionContext } from '@nestjs/common';

@Injectable()
export class AuthGuard implements CanActivate {
  canActivate(context: ExecutionContext): boolean {
    const request = context.switchToHttp().getRequest();
    return validateRequest(request);
  }
}

//Pipe
//    역할: 요청 데이터를 변환하고 검증한다.
//    적용: 특정 매개변수, 컨트롤러 메서드, 또는 전역적으로 적용될 수 있다.
//    순서: 가드 이후, 컨트롤러 핸들러에 전달되기 전에 실행된다.
import { PipeTransform, Injectable, ArgumentMetadata, BadRequestException } from '@nestjs/common';

@Injectable()
export class ParseIntPipe implements PipeTransform<string, number> {
  transform(value: string, metadata: ArgumentMetadata): number {
    const val = parseInt(value, 10);
    if (isNaN(val)) {
      throw new BadRequestException('Validation failed');
    }
    return val;
  }
}
Guard는 single responsibility를 가진다. 이들은 주어진 request가 route handler에 다뤄질 것인지 아닐 지를 결정한다. (permission, role, ACLs. etc에 의거하여) 이는 종종 authorization, authentication으로 사용된다. Authorization(authentication)은 전통적인 Express application에서는 middleware에 의해 다뤄진다. middleware는 authentication에서는 괜찮은 선택이다. token 검증이나 request object에 속성을 붙이는 작업은 특정 rotue context(및 그 메타데이터)와 강하게 연결되어 있지 않기 때문이다.
허나 middleware은 멍청하다. next() function 호출 이후에 어떤 handler가 실행됬는지 알지 모른다. 반면에 Guard는 ExecutionContext instance에 접근한다. 즉, 바로 다음에 무엇이 실행될지 정확하게 안다. exception filter, pipe, 그리고 interceptor과 같이 guard는 request/response cycle의 정확한 지점에서 처리 로직을 선언적으로 삽입할 수 있도록 설계되었다. 이것은 code를 DRY하고 선언적으로 만들어 준다.
ExecutionContext: API 요청이 서버에 도달하면, NestJS는 이 요청에 대한 정보를 ExecutionContext 객체에 캡슐화한다.
    이 컨텍스트 객체는 요청의 세부 사항을 포함하며, 이를 통해 Guard, Interceptor, Pipe, Exeception Filter 등이 요청을 처리할 수 있다.
    1. 현재 실행 컨텍스트 정보 제공
        - 요청 객체, 응답 객체, 컨트롤러 및 핸들러 메서드에 대한 정보를 제공한다.
        - Guard, Interceptor, Filter, Pipe 등이 이 정보를 활용하여 특정 로직을 실행할 수 있다.
    2. 상황별 분기 처리
        - HTTP, WebSocket, RPC(Remote Porcedure Call) 등 다양한 프로토콜에 대해 적절한 컨텍스트를 제공한다.
        - 각 프로토콜에 맞는 요청 처리를 구현할 수 있다.
<팁!> Guards는 모든 middleware 이후에, 그리고 intercepter or pipe 이전에 실행된다.
Authorization guard
언급한대로, authorization은 Guard를 쓰는 대표적인 시스템이다. 왜냐하면 caller(보통 authenticated user)가 충분한 permission을 가질 때 특정한 route를 호출할 수 있어야 하기 때문이다. AuthGuard authenticated user를 짐작한다.(request header에 token이 붙어있는) Guard는 token을 추출하고 검증할 것이다. 그리고 추출된 정보를 사용하여 request가 처리될지 말지를 결정한다.
import { Injectable, CanActivate, ExecutionContext } from '@nestjs/common';
import { Observable } from 'rxjs';

@Injectable()
// AuthGuard가 CanActivate를 구현하여 가드로써 동작할 수 있다.
export class AuthGuard implements CanActivate {
  // canActivate 메서드는 요청이 특정 경로에 접근할 수 있는지 여부를 결정한다.
  // context: 현재 요청의 실행 컨텍스트를 나타내는 ExecutionContext 객체
  // boolean, Promise<boolean>, Observable<boolean> 중 하나를 반환하여 요청이 허용될지 여부를 결정한다.
  canActivate(
    // 현재 요청의 실행 컨텍스트를 나타내는 ExecutionContext 객체
    context: ExecutionContext,
  ): boolean | Promise<boolean> | Observable<boolean> {
    const request = context.switchToHttp().getRequest();
    // 주어진 요청 객체의 유효성을 검증하는 역할을 한다.
    // 이 함수는 사용자 정의 함수이며, 주로 요청이 적절한 인증 및 권한을 가지고 있는지 확인하는 데 사용된다.
    // e.g. JWT 토큰의 유효성 검사. 사용자 권한 확인 등을 포함할 수 있다.
    return validateRequest(request);
  }
}
실행 컨텍스트
API 요청이 서버에 도달하면, NestJS는 이 요청에 대한 정보를 ExecutionContext 객체에 캡슐화한다. 이 Context 객체는 요청의 세부 사항을포함하며, 이를 통해 Uard, Interceptor, Pipe, Exception Filter 등이 요청을 처리할 수 있다.
<팁!> 만일 이러한 검증 시스템이 어떤 메커니즘으로 돌아가는지 알고 싶다면, 이 챕터를 찾아가라. 마찬가지로 정교한 authorization example를 확인하고 싶다면 이 챕터를 참고하라.
validateRequest() function의 내부 로직은 simple하거나 정교할 수 있다. 이번 예제의 핵심 포인트는 어떻게 guard가 reqeust/response cycle에서 동작하는가 이다.
모든 guard는 반드시 canActivate() 함수를 구현해야 한다. 이 함수는 현재 request가 허용할지 말지를 나타내는 boolean값을 return 해야한다. 그리고 synchronously 또는 asynchronously 한지에 대한 response를 반환할 수 있다.(Promise 또는 Observable을 통해) Nest는 next action을 제어하기 위해 return value를 사용해야 한다.
만일 true를 반환하면 request가 처리되야 함
만일 false를 반환하면 request를 거절해야함
Execution context
canActivate() function은 single argument, ExecutionContext instance를 받는다. ExecutionContext는 ArgumentsHost를 상속받는다. 우리는 ArgumentsHost는 이전 filter chapter에서 다루었다. 위의 sample에서, ArgumentsHost에 정의된 동일한 helper method를 사용하여 request 객체에 대한 참조를 얻고 있다. exception filters의 Arguments host section에서 더 자세히 알 수 있다.
ArgumentsHost를 확장함으로써, ExecutionContext 또한 몇 개의 새로운 helper methods를 추가할 수 있다. 이들은 현재 실행중인 process에 대한 추가 detail들을 제공한다. 이러한 detail들은 좀더 generic한 guard를 설계하는데 유용하다. guard들은 controllers, methods 그리고 execution context에 걸쳐서 사용된다. ExecutionContext에 대한 자세한 설명
ArgumentsHost
    - 다양한 유형의 핸들러(HTTP, RPC, WebSocket 등)에 대해 인수를 가져오는 데 사용된다.
    - 파이프, 인터셉터, 예외 필터 등에서 인수를 다루는 데 사용된다.
    주요 메서드
        1. getArgs(): 인수 배열을 반환한다.
        2. getArgByIndex(index: number): 특정 인수를 반환한다.
        3. switchToHttp(): HTTP 컨텍스트로 전환한다.
        4. swtichToRpc(): RPC 컨텍스트로 전환한다.
        5. switchToWs(): WebSocket 컨텍스트로 전환한다.

ExecutionContext
    - ArgumentsHost를 확장하여 실행 컨텍스트에 대한 더 많은 정보를 제공한다.
    - 현재 실행 중인 컨텍스트(컨트롤러, 핸들러 등)에 대한 추가 메타데이터를 제공한다.
    - 주로 가드와 인터셉터에서 컨트롤러와 핸들러 수준의 정보를 다루는데 사용
    주요 메서드
        1. getClass(): 현재 실행 중인 클래스(컨트롤러)를 반환한다.
        2. getHandler(): 현재 실행 중인 핸들러(메서드)를 반환한다.
        3. getType(): 현재 실행 중인 컨텍스트 타입을 반환한다.
Role-based authentication
이제 좀더 기능적인 특정한 규칙을 통해 허락된 유저만 가능토록하는 기능적인 guard를 설계해보자. 일단 먼저 basic guard template로 시작한다. 아래의 코드는 all request가 처리되도록 허용한다.
pipe나 exception filter와 같이, guard는 controller-scoped, global-scoped가 될 수 있다. 아래에서는 @UseGuards() decorator를 사용하여 controller-scoped guard를 설정했다. 이 decorator는 single argument, 혹은 comma-separated list of arguments가 받는다. 이는 한번의 선언(declaration)으로 적절한 guard set이 적용되도록 한다.
@Controller('cats')
@UseGuards(RolesGuard)
export class CatsController {}
<팁!> @nestjs/common package를 통해 @UseGuards()를 import한다.
위에서 RolesGuard class를 전달한다.(instance가 아닌), 이는 framework에게 instance화의 책임을 넘기고 DI를 가능케 한다. pipe와 exception filter와 비슷하게, instance를 넘겨줄 수 있다.
@Controller('cats')
@UseGuards(new RolesGuard())
export class CatsController {}
위의 구조는 controller에 선언된 모든 handler는 guard가 붙여진다. 만일 single method에 guard가 붙여지길 원한다면, 우리는 @UseGuards() decorator를 method level에서 적용할 수 있다.
global guard를 설정하기 위해서, Nest application instance의 useGlobalGuards() method를 사용할 수 있다.
hybrid App의 경우 useGlobalGuards() method는 gateway나 micro service에 guard() 설정하지 못한다.(만일 바꾸고 싶다면 Hybird application 참고) "standard"(non-hybird) microservice app의 경우, useGlobalGuard()는 guard를 global하게 마운트된다.
Global guard의 경우 전체 application, 모든 controller, 모든 route handler에 사용된다. Dependency injection 관점에서, module(위의 코드 처럼 useGlobalGuards())의 바깥에서 global guards는 dependency를 inject하지 못한다. 왜냐하면 이는 모듈의 바깥에서 이루어졌기 때문이다. 이러한 문제를 해결하기 위해, 다음과 같은 방식으로 module에서 바로 guard를 설정하면 된다.
import { Module } from '@nestjs/common';
import { APP_GUARD } from '@nestjs/core';

@Module({
  providers: [
    {
      provide: APP_GUARD,
      useClass: RolesGuard,
    },
  ],
})
export class AppModule {}
<팁!> guard에 대해 이러한 방식으로 dependency injection을 사용할 때, 이러한 구성이 사용되는 모듈에 관계없이 실제로 전역적이라는 점에서 유의해야한다. 어디서 이 작업을 수행할까? guard(위의 예제에서 정의된 RolesGuard)를 정의한 module을 선택해라. 또는 useClass는custom provider 등록을 처리하는 유일한 방법이 아니다. 자세히
Setting roles per handler
앞의 RolesGuard는 잘 동작한다. 하지만 그렇게 smart하지는 않다. 아직 guard의 기능 들중 가장 중요한 것을 보지 않았다.(execution context). 아직 역할이나 각 핸들러에 허용된 역할에 대해 알지 못한다. 예를 들어 CatsController의 경우 다양한 route에 대해 permisstion scheme가 다르다. 일부는 오직 admin user에게만 가능할 수도 있고, 다른 것들은 everyone에게 허용될 수 있다. 어떻게 다양한 route에 대해 각각에 role를 유연하고 재사용가능하게 맞출 수 있을까?
여기서 custom metadata가 중요한 역할을 한다. 자세히 Nest는 Reflector.createDecorator static method를 통해 만들어진 decorator나 built-in @SetMetadata() decorator를 통해 custom metadata를 route handler에 붙이는 능력을 제공한다.
예를 들어, metadata를 handler에 붙여주는 Reflector.createDecorator method를 통해 @Roles() decorator를 만들었다고 가정하자. Reflector는 @nestjs/core package에서 framework에 의해 제공된다.
Roles decorator metadata를 create() method에 붙인다. 결국 admin이 있는 user만 이 route에 접근할 수 있다.
대신 Reflector#createDecorator method를 붙이면, 내장된 @SetMetadata() decorator를 사용할 수 있다. 자세히
Putting it all together
앞으로 돌아가 RolesGuard를 다시 묶어준다. 현재, request에 대해 모두 true를 반환한다. 현재 사용자가 할당받은 역할을 현재 처리 중인 route에 필요한 실제 역할과 비교하여 반환 값을 조건부로 만들고자 한다. route의 역할(custom metadata)에 접근하기 위해서, Reflector helper class를 다시 사용해야 한다.
// roles.decorator.ts
import { SetMetadata } from '@nestjs/common';

// SetMetadata(메타데이터 키, 메타데이터 값)
export const Roles = (...roles: string[]) => SetMetadata('roles', roles);

// roles.guard.ts
import { Injectable, CanActivate, ExecutionContext } from '@nestjs/common';
import { Reflector } from '@nestjs/core';
import { Roles } from './roles.decorator';

@Injectable()
export class RolesGuard implements CanActivate {
  constructor(private reflector: Reflector) {}

  // 요청이 핸들러에 접근할 수 있는지 여부를 결정한다.
  canActivate(context: ExecutionContext): boolean {
    // context.getHandler()를 통해 현재 핸들러의 메타데이터를 가져온다.
    // 메타데이터 키 'roles'에 설정된 역할들을 가져와서, 현재 요청을 보낸 사용자의 역할과 비교
    const roles = this.reflector.get('roles', context.getHandler());
    // 역할이 정의되어 있지않다면, 모두 허용한다는 의미
    if (!roles) {
      return true;
    }
    // api를 요청하는 유저의 roles과 현재 api에 지정된 roles를 비교
    const request = context.switchToHttp().getRequest();
    const user = request.user;
    return matchRoles(roles, user.roles);
  }
}

// admin.controller.ts
import { Controller, Get, UseGuards } from '@nestjs/common';
import { RolesGuard } from './roles.guard';
import { Roles } from './roles.decorator';

@Controller('admin')
@UseGuards(RolesGuard)
export class AdminController {
  @Get()
  @Roles('admin') // 'admin' 역할이 필요함을 나타내는 데코레이터
  findAll() {
    return 'This is an admin route';
  }
}
<팁!> node.js에서, authorized user를 request object에 붙이는 것은 흔한 관행이다. 즉, 위의 코드에서, request.user는 user instance와 허용된 역할을 가지고 있다고 가정하고 가져온다. app 내에서, custom authentication guard(or middleware)에서 이러한 연관을 만들 가능성이 높다. 다음 챕터에서 자세히
<주의사항!> matchRoles() 함수 내의 logic은 simple하거나 sophisticated 할 수 있다. 이 example의 포인트는 어떻게 guard가 request/response cycle에서 보여지는가 이다.
Reflection and metadata을 참고해라. endpoint에서 만일 user가 불충분한 권한으로 request 한다면, nest는 자동으로 다음과 같은 response를 보낸다.
Pipe는 @Injectable() decorator로 명시된 class이다. 이는 PipeTransform interface를 받는다.
클라이언트가 특정 API를 요청한다면, 먼저 middleware가 요청을 처리하고, 이후 pipe가 요청 데이터를 변환 및 검증하여 컨트롤러 메서드에 전달하게 된다.
Pipe는 두 가지의 역할을 한다.
transformation: input data를 원하는 형태의 form으로 바꿔준다.(e.g. string to integer)
validation: input data를 검사한다. 그리고 valid하다면 그대로 넘기고 그렇지 않다면 error를 발생시킨다.
위의 두 경우에서, pipe는 controller route handler에 의해 처리된 arguments에 의해서 동작한다. Nest는 method가 실행되기 전 pipe를 배치 시킨다. 그리고 pipe는 method로 전달될 argument를 받아서 작업을 수행한다. pipe를 통한 transformation 그리고 validation의 작업을 마친 후에, route handler가 그 변환된 argument로 실행시킨다.
parameter(매개변수): 함수 안에서의 정의 및 사용에 나열되어 있는 변수들을 의미
argument(전달인자): 함수를 호출할 때 전달되는 실제 값들
Nest는 별도의 설치가 필요없는 몇 개의 built-in된 pipe를 지닌다. 또한 pipe를 사용자에 맞게 custom 할 수 있다. 이번 chapter에서는, build-in pipe를 소개하고, 어떻게 그들을 route-handler와 묶을 수 있는지를 소개한다. 그리고 여러 custom pipe를 살펴보면서 처음부터 하나를 만드는 방법을 소개한다.
<팁!> pipe는 exception zone 내부에서 동작한다. 이는 만일 Pipe가 exception을 발생시켜도, 이는 exception layer에 의해 처리된다. (global exceptions filter 그리고 어떤 exception filters) pipe에서 exception이 발생하면, 그 이후에 controller method가 실행되지 않는다는 점이 분명하다. 이는 application에서 들어오는 data의 validation을 검사하는데 있어 굉장히 유용하다.
Middleware, pipe, filter
위의 3개의 장치의 순서는 다음과 같다. Middleware -> pipe, 그리고 filter
Middleware는 reqeust와 response 객체를 변형하거나, 특정 조건에 따라 요청을 차단하거나 logging을 수행한다. 주로 HTTP 요청을 처리하는 초기 단계에서 작동한다.
요청 로깅: 요청 정보를 기록
인증(Authentication): 사용자의 인증을 처리한다.
권한 부여(Authorization): 사용자의 권한을 확인한다.
요청 변환(Request Transformation): 요청 데이터를 변환하거나 검증한다.
응답 변환(Response Transformation): 응답 데이터를 변환하거나 포맷한다.
Pipe는 요청 데이터를 변형하거나 유효성을 검사한다. 주로 데이터 변환과 유효성 검사를 수행한다.
변환(Transformation): 입력 데이터를 원하는 형식으로 변환한다. 예를 들어, 문자열을 정수로 변환할 수 있다.
유효성 검사(Validation): 입력 데이터가 특정 조건을 만족하는지 확인한다. 조건을 만족하지 않으면 예외를 발생시킨다.
Filter는 예외가 발생했을 때 이를 처리하여, 적절한 응답을 클라이언트에게 반환한다.
Built-in pipes
Nest는 9개의 pipe가 내장되어 있다. @nestjs/common에서 import 할 수 있다.
ValidationPipe: 입력 데이터를 유효성 검사를 통해 확인. class-validation library와 함께 사용하여 DTO를 기반으로 유효성 검사 수행
DefaultValuePipe: 특정 파라미터가 없을 때 기본값으로 설정한다. 주로 선택적 파라미터에 사용
ParseFilePipe: 파일 업로드 시 파일을 파싱하고 검증한다. 주로 파일 크기, 타입 등의 조건을 확인
먼저 ParseIntPipe를 살펴보자. transformation을 수행한다.. 여기서 pipe는 method handler parameter가 javascript integer를 바뀜을 보장해준다.(만일 변환에 실패하면 exception을 던진다.) 후의 chapter에서는 ParseIntPipe을 implementation 간단한 custom pipe를 만들 것 이다. 아래의 예제들은 ParseBoolPipe, ParseFloatPipe, ParseEnumPipe, ParseArrayPipe, ParseUUIDPipe와 같은 다른 내장 transformation pipe들에도 적용된다. 이 글에서 이러한 pipe를 'Parse*' 라고 서술할 것이다.
Binding pipes
pipe를 사용하기 위해, pipe class의 instace를 적절한 context에 bind해야한다. 아래의 ParseIntPipe 예시에서, 특정한 route handler method와 pipe를 연결할 것이다. 그리고 method가 호출되기 전에 pipe가 실행될 것이다. 다음과 같은 구조로 사용하여, method parameter 수준에서 pipe를 binding한다.
위에서는 ParseIntPipe의 class를 호출하는 것이지, instance가 아니다. 이는 framework에 instance화의 책임을 떠넘기고 dependency injection을 가능케 한다. pipe와 guard와 마찬가지로, in-place instance를 전달할 수 있다. in-place instance를 전달하는 것은 built-in pipe의 행동을 설정하는데 있어서 유용하다.
앞서 언급한 대로, pipe를 customize화 할 수 있다. Nest는 강력한 ParseIntPipe그리고 ValidationPipe를 제공하지만, custom pipe가 어떻게 동작하는지 살펴보기 위해 간단한 custom version을 만들어 보자.
간단하게 input value를 받아 그대로 return 하는 pipe를 만들어보자.
import { PipeTransform, Injectable, ArgumentMetadata } from '@nestjs/common';


// ValidationPipe 클래스를 NestJS의 의존성 주입 시스템에 등록한다. 이를 통해 다른 클래스에서 이 파이프를 주입하여
// 사용할 수 있다.
@Injectable()
// PipreTransform 인터페이스를 구현하여 파이프로 사용될 수 있다.
export class ValidationPipe implements PipeTransform {
  // transform 파이프의 핵심 메서드로, 입력 값을 변환한다.
  //    value: 파이프에 전달된 입력 값
  //     metadata: 현재 인수에 대한 메타 데이터
  transform(value: any, metadata: ArgumentMetadata) {
    return value;
  }
}
<팁!> PipeTransform(string, number)를 했을 때의 console.log(metadata)의 결과
<팁!> PipeTransform<T,R> 은 반드시 모든 pipe에서 implement해야하는 generic interface이다. T는 input value의 타입이며, R은 transform() method의 return 타입이다.
import { PipeTransform, Injectable, ArgumentMetadata, BadRequestException } from '@nestjs/common';

@Injectable()
export class ParseIntPipe implements PipeTransform<string, number> {
  transform(value: string, metadata: ArgumentMetadata): number {
    const val = parseInt(value, 10);
    if (isNaN(val)) {
      throw new BadRequestException('Validation failed');
    }
    return val;
  }
}
모든 pipe는 PipeTransform interface에 의해 transform() method를 호출해야한다. 이 method는 다음과 같은 두 개의 parameter를 가진다.
value: transform 메서드에 전달되는 값으로, 변환 또는 검증이 필요한 입력 데이터이다.
출처: 이 값은 controller method의 parameter에서 가져온다.
용도: validation 검사나 data transform을 수행할 때 사용된다.
metadata: 현재 인수에 대한 메타데이터를 제공한다.
구성: ArgumentMetadata 인터페이스를 통해 제공된다.
type: body, query, param, custom 중 하나로, 인수의 위치를 나타낸다.
metatype: 변환 전 원시 타입(String, Number, Boolean)
data: parameter의 이름(e.g. 'id')이다.
value parameter는 현재 처리되고 있는 method argument(route handling method가 받기 전의 argument)이며, metadata는 현재 처리되는 method의 argument의 metadata이다. metadata 객체는 다음과 같은 속성들을 가진다.
create method에 대한 모든 request가 valid한 body를 포함하도록 보장하고 싶다. 그래서 createCatDto 객체의 3개의 member의 유효성 검사를 실시해야 한다. 물론 이러한 검사를 route handler method 내부에서 실시할 수 있다. 허나 이는 single responsibility principle(SRP) 을 위배 한다.
단일 책임 원칙(Single Responsibility Principle): 객체는 단 하나의 책임만 가져야 한다. 하나의 클래스는 하나의 기능을 담당 하여 하나의 책임을 수행하는데 집중되어야 있어야 한다는 의미한다. 한 객체에 책임이 많아질 수록 클래스 내부에서 서로 다른 역할을 수행하는 코드 끼리 강하게 결합될 가능성이 높아지게 되어 시스템이 복잡해질 수 있다.
다른 접근법으로는 validator class를 만들고 유효성검사를 위임하는 것이다. 이 방법의 단점은 각 method의 시작 부분에서 이 validator 검사기를 호출해야 한다는 점이다.
validation middleware를 만드는 것은 어떤가? 이 방법이 작동할 수는 있지만, 불행하게도 application의 전체 context에 사용되는 generic middleware를 만드는 것이 불가능하다. 이는 middleware가 호출될 handler와 그 parameter를 포함한 execution context를 인지하지 못하기 때문이다.
middleware는 execution context를 알지 못한다는 것의 의미:
    미들웨어가 실행 컨텍스트를 알지 못한다는 것은, 미들웨어가 특정 요청을 처리하는 동안 어떤 컨트롤러나 메서드가 호출될 지, 그리고 그 메서드의 매개변수가 무엇인지 알지 못한다는 뜻이다. 미들웨어는 주로 요청과 응답 객체만을 처리하며, 어플리케이션의 특정 비즈니스 로직이나, 컨트롤러 메서드에 대한 구체적인 정보를 알지 못한다.
pipe는 nestjs에서 요청 데이터를 변환하고, 유효성 검사를 위해 설계된 도구이다. 따라서 유효성 검사를 위해 파이프를 사용하는 것이 적절하다. 이제 validation pipe를 정교하게 다듬어 보자.
Object schema validation
object의 validation을 위한 clean하고 DRY한 여러 방법이 있다. 첫 번째 방법은 schema-based validation을 사용하는 것이다.
DRY(Don't repeat yourself): 소프트웨어 개발 원칙 중 하나로, 동일한 코드나 로직을 반복하지 않도록 하는 중요한 개념이다.
schema-based: 데이터의 형식과 제약 조건을 정의하는 schema를 사용하여 데이터를 검증한다.
    schema는 데이터 구조, 필수 필드, 데이터 타입, 혀옹되는 값의 범위 등을 명확히 정의한다.
Zodlibrary는 readable API와 함께 schema를 만드는데 사용된다. Zod-based schema를 만드는 validation pipe를 만들자.
//Zod는 TS 및 JS에서 사용되는 schema 선언 및 validation 검사 라이브러리다.
import { z } from 'zod';

// 스키마 정의
const userSchema = z.object({
  name: z.string(),
  age: z.number().min(18),
});

// 데이터 유효성 검사
const result = userSchema.safeParse({ name: "John", age: 25 });

if (!result.success) {
  console.error(result.error);
} else {
  console.log("Valid data:", result.data);
}
먼저 package를 설치해야 한다.
$ npm install --save zod
constructor argument로서 schema를 만드는 간단한 class를 만든다. 이 때 schema.parse() method를 적용하는데, 이는 incoming argument의 유효성을 검사한다.
앞서 언급한 대로, validation pipe는 값을 그대로 반환하거나 에러를 던진다.
다음 section에서는 어떻게 @UsePipes() 를 통해 controller method에 적절한 schema를 던지는가를 볼 것이다. 이렇게 하는 것은 reusable validation pipe를 전체 context를 걸쳐 적용하게 한다.
import { PipeTransform, ArgumentMetadata, BadRequestException } from '@nestjs/common';
import { ZodSchema } from 'zod';

export class ZodValidationPipe implements PipeTransform {
  // 생성자에서 ZodSchema 타입의 스키마를 받아와 저장한다.
  // 아래의 userSchema와 비교
  constructor(private schema: ZodSchema) {}

  // value: 검증할 입력 값, metadata: 매개변수에 대한 metadata를 제공
  transform(value: unknown, metadata: ArgumentMetadata) {
    try {
      // schema.parse를 사용하여 값을 검증하고 변환한다.
      const parsedValue = this.schema.parse(value);
      return parsedValue;
    } catch (error) {
      throw new BadRequestException('Validation failed');
    }
  }
}

// 사용 예시
import { z } from 'zod';

const userSchema = z.object({
  name: z.string().min(1),
  age: z.number().int().min(0),
  email: z.string().email(),
});


@Controller('users')
export class UsersController {
  @Post()
  create(@Body(new ZodValidationPipe(userSchema)) createUserDto: CreateUserDto) {
    return this.usersService.create(createUserDto);
  }
}
Binding validation pipes
앞서, 어떻게 transformation pipe(ParseIntpipe, 또는 Parse* )가 bind 되는지를 살펴보았다.
이번에는, method call level에서 pipe를 bind할 것이다. 현재 예시에서, ZodValidationPipe를 사용할 것이다.
ZodValidationPipe의 instance를 만든다.
Pipe의 class constructor에 context 별 Zod schema를 전달한다.
pipe랑 method랑 연결 한다.
import { z } from 'zod';

export const createCatSchema = z
  .object({
    name: z.string(),
    age: z.number(),
    breed: z.string(),
  })
  .required();

// createCatSchema의 스키마를 기반으로 Typescript 타입을 생성
export type CreateCatDto = z.infer<typeof createCatSchema>;
<주의사항!> zod 라이브러리는 tsconfig.json file에서 strictNullChecks 옵션이 필요하다.
Class validator
<주의사항!> 이번에 배우는 것은 Typescript에서 요구하는 것이다. 만일 vanilla JavaScript라면 필요없다.
validation technique에 대해 대체 구현을 살펴보자. Nest는 class-validator 라이브러리에 잘 작동한다. 이는 decorator기반의 validate를 가능케 한다. decorator 기반의 유효성 검사는 Nest의 파이프 기능과 결합할 때 매우 강력하다. 이는 처리되는 속성 metatype에 접근할 수 있기 때문이다.
$ npm i --save class-validator class-transformer
패키지를 이용하면 CreateCatDto class에 몇 개의 decorator를 추가할 수 있다. 여기에는 몇 가지 장점이 있다. 별도의 유효성 검사를 위한 Class를 만들 필요가 없이 데이터를 검증할 수 있다.
import { PipeTransform, Injectable, ArgumentMetadata, BadRequestException } from '@nestjs/common';
import { validate } from 'class-validator';
import { plainToInstance } from 'class-transformer';

@Injectable()
export class ValidationPipe implements PipeTransform<any> {
  // value: 검증할 입력값, metadata: 입력 값의 메타데이터(type 정보 등...)
  async transform(value: any, { metatype }: ArgumentMetadata) {
    // metatype이 없거나 기본 타입인 경우 검증하지 않고 값을 그대로 반환, 검증을 수행할 필요가 없음을 의미
    //     - metatype이 없다는 것은, 요청된 데이터의 타입 정보가 제공되지 않았음을 의미한다. NestJS에서 파이프는
    //         입력 값의 메타타입을 통해 어떤 타입을 변환해야 하는지, 그리고 어떤 검증을 수행해야 하는지를 결정한다.
    // toValidate(metatype) : 기본 타입(String, Boolean, Number, Array, Object)이 아닌 경우에만 검증을 수행하도록 함
    //    - toValidate method는 메타타입이 기본 타입(String, Boolean, Number, Array, Object)인지 확인
    if (!metatype || !this.toValidate(metatype)) {
      return value;
    }

    // class-transformer의 plainToInstance 함수를 사용하여 일반 JS객체('value')를 특정 클래스('metatype')의 인스턴스로 변환
    const object = plainToInstance(metatype, value);
    // validate 함수를 사용하여 변환된 객체('object')의 유효성을 검사한다.
    // 유형성 검사에 실패하면, 유효하지 않은 필드와 관련된 오류 정보가 배열 형태로 저장된다.
    // 성공하면, errors 배열은 비어 있다.
    const errors = await validate(object);
    if (errors.length > 0) {
      throw new BadRequestException('Validation failed');
    }
    return value;
  }

  private toValidate(metatype: Function): boolean {
    const types: Function[] = [String, Boolean, Number, Array, Object];
    // types 배열에 포함되어 있으면 false를 반환하여 검증을 건너뛴다.
    // 포함되어 있지 않으면, true를 반환하여 검증을 수행
    return !types.includes(metatype);
  }
}
<팁!> 앞서 언급한 대로, ValidationPipe는 Nest에서 기본적으로 제공해주기에 별도의 generic validation pipe를 만들 필요가 없다. built-in ValidationPipe는 이번 쳅터에서 만든 sample보다 더 많은 option을 지닌다. 자세한 사항
우리는 위에서 class-transformer 라이브러리를 사용했는데, 이는 class-validator 라이브러리와 동일한 작성자가 만든 것이므로 이 두 라이브러리는 매우 잘 호환됩니다.
위의 코드에서 주목해야할 5개가 있다. 첫 번째로, transform() method는 async가 붙어있다. 이는 Nest에서는 synchronous와 asynchronous pipe 둘다 지원하기 때문이다. asynch method를 만들었는데, 이는 일부 class-validator validations는 Promises를 이용해서 async가 될 수 있기 때문이다.
두 번째로, destructuring을 통해 metatype를 ArgumentMetadata에서 추출했다. 이는 ArgumentMetadata의 전부를 뽑아내서 metatype 변수를 할당하는 추가 구문을 사용하는 것에 대한 간단한 표현이다.
세 번째로, helper function인 toValidate() 를 주목해야 한다. 현재 처리 중인 argument가 native JavaScript 타입일 경우, 유효성 검사 단계를 건너뛰는 역할을 한다. 이 타입들은 유효성 검사 decorator를 붙일 수 없으므로, 유효성 검사 단계를 거칠 필요가 없다.
네 번째로, class-transformer의 plainToInstance() 를 사용한다. 이는 일반 javascript argument object를 타입이 지정된 object로 바꿔준다. 그래서 validation을 검사할 수 있다. 반드시 이것을 해야하는 이유는 incoming post body object(network request에서 deserialized된)는 타입 정보를 가지고 있지 않기 때문이다.(이는 Express와 같은 기본 플랫폼이 작동하는 방식이다.) Class-validator은 앞서 DTO에서 정의 내린대로 validation decorator를 사용해야 하므로, 들어오는 본문을 단순한 일반 객체가 아닌 적절히 decorator가 적용된 object로 처리하기 위해 이 변환을 수행해야 한다.
마지막으로, 앞서 언급한 대로 이것은 validation pipe이기에, 바뀌지 않은 값, 혹은 에러를 던진다.
마지막 스탭은 ValidationPipe를 bind 하는 것이다. Pipe는 parameter-scoped, method-scoped, controller-scoped, global-scoped가 될 수 있다. 일찍이, Zod 기반의 validation pipe로, method 수준에서 binding 예를 봤다. 이번 아래의 예는, pipe instance를 route handler에 @Body() decorator 로 묶을 것이다. 그래서 pipe는 post body의 유효성 검사를 위해 호출될 것 이다.
hybrid apps의 경우에 useGlobalPipes() method는 gateway와 microservice에 대해 pipe를 설정하지 않는다. "표준"(non-hybrid) microservice 앱의 경우, useGlobalPipes()는 pipe를 전역적으로 mount한다.
Global pipe는 전체 application, 모든 controller, 모든 route handler에 사용된다.
Dependency Injection면에서는 (위의 예시 처럼 useGlobalPipes() 로) 어떤 module 밖에서 등록된 global pipes는 dependency를 주입하지 못한다. 왜냐하면 binding이 어떤 module의 밖에서 일어났기 때문이다. 이를 해결하기 위해서, module에서 바로 global pipe를 설정할 수 있다.
import { Module } from '@nestjs/common';
import { APP_PIPE } from '@nestjs/core';

@Module({
  providers: [
    {
      provide: APP_PIPE,
      useClass: ValidationPipe,
    },
  ],
})
export class AppModule {}
<팁!> pipe에 대해 이러한 접근으로 dependency injection을 수행할 때, 이 구성을 사용하는 module에 관계없이 pipe는 global하다. 어디서 수행되는가? pipe(위의 예제의 경우 ValidationPipe)가 정의된 모듈을 선택한다. 또한 useClass는 custom provider registration을 처리하는 유일한 방법은 아니다. 자세히
The built-in ValidationPipe
앞서 언급한 대로, ValidationPipe가 이미 Nest에서 제공하기 때문에 따로 generic validation pipe를 build할 필요가 없다. 내장된 ValidationPipe는 이번 쳅터에서 다룬 것보다 더 많은 옵션을 제공한다. 자세히
Transformation use case
유효성 검사는 커스텀 파이프의 유일한 사용 사례가 아니다.이 쳅터의 처음에서 pipe는 inputdata를 원하는 format으로 바꿀 수 있다고 했다. 이것이 가능한 것은 transform 함수에서 반환된 값은 이전의 argument 값을 덮어 씌우기 때문이다.
언제 유용한가? 가끔 client으로부터 전달된 data를 change할 필요가 있다. 예를 들어 string to integer, route handler method에 의해 다뤄지기 전에. 게다가, 어떤 required data filed가 missing됬을 때 이를 default value로 바꿀 필요가 있다. Transformation pipes가 processing function과 client request 또는 request handler 사이에 위치에서 이를 수행한다.
ParseIntPipe는 string을 integer value로 바꿀 수 있다.
import { PipeTransform, Injectable, ArgumentMetadata, BadRequestException } from '@nestjs/common';

@Injectable()
export class ParseIntPipe implements PipeTransform<string, number> {
  transform(value: string, metadata: ArgumentMetadata): number {
    // 10진법으로 변환
    const val = parseInt(value, 10);
    if (isNaN(val)) {
      throw new BadRequestException('Validation failed');
    }
    return val;
  }
}
pipe랑 param을 묶을 수 있다.
@Get(':id')
async findOne(@Param('id', new ParseIntPipe()) id) {
  return this.catsService.findOne(id);
}
다른 유용한 transformation case는 request에서 공급된 id를 이용하여 DB에서 user entity에서 select하는 것이다.
// userEntity는 UserByIdPipe에 의해 처리된 결과로, UserEntity 타입의 객체이다.
@Get(':id')
findOne(@Param('id', UserByIdPipe) userEntity: UserEntity) {
  return userEntity;
}
다른 모든 transformation pipe와 마찬가지로, input value(an id)를 받아 출력 값(UserEntity object)을 반환한다는 점에 유의해야 한다. 이렇게 하면 반복되는 코드를 handler에서 공통 pipe로 추상화하여 선언적이고 DRY(중복 배제)하게 만들 수 있다.
Providing defaults
Parse* pipes 는 parameter의 값이 정의되어 있을 것으로 예상한다. pipe들은 null 혹은 undefined values를 받으면 exception을 던질 것 이다. endpoint에서 놓친 query string parameter value를 다루도록 하기 위해서, 이러한 값에 대해 작동하기 전에 default value를 제공해야 한다. DefaultValuePipe는 이러한 목적으로 제공된다. 간단히 @Query() decorator에서 DefaultValuePipe를 인스턴스화 해서 넣으면 된다.
Nest에는 exception layer이 내장되어 있다. 이는 application의 전반에 걸쳐 모든 unhandled exception의 처리에 책임이 있다. 만일 개발자의 application code에 의해 발생되는, not handled한 exception이 발생할 때, 이것을 이 layer가 처리한다. 그리고 바로 자동적으로 적절하게 user-friendly response를 보낸다.
별도의 설치나 설정이 필요없이, 이러한 action은 built-in된 global exception filter에 의해 수행된다. 이러한 filter는 HttpException(혹은 이것의 subclass) type의 exception(예외)를 다룬다. 만일 unrecognized한 exception이 발생한다면(HttpException, HttpException에 의한 class가 둘다 아님), built-in된 exception filter가 다음과 같은 default JSON response를 일으킨다.
{
  "statusCode": 500,
  "message": "Internal server error"
}
<팁!> global exception filter는 부분적으로 http-errors library를 지원한다. 기본적으로, statusCode 그리고 message 속성을 포함하는 모든 exception은 적절하게 채워서 response로 반환된다. (기본적으로 인식되지 못한 예외에 대한 InternalSererErrorException 대신)
Throwing standard exceptons
Nest는 @nestJs/common에서의 build-in HttpException class를 제공한다. 전형적인 HTTP REST/GraphQL API 기반 applications에 대해서, 특정한 error가 발생했을 때, standard한 HTTP response object를 보내는게 best이다.
예를 들어, CatsController에서의 findAll() method가 있다고 하자. 그리고 어떠한 reason으로 route handler가 exception을 throw했다고 하자. 다음과 같다.
@Get()
async findAll() {
  throw new HttpException('Forbidden', HttpStatus.FORBIDDEN);
}
<팁!> @nestjs/common의 HttpStatus는 상태 정보를 담는 enum helper 이다.
만일 client가 endpoint에서 호출한다면, response는 다음과 같다.
{
  "statusCode": 403,
  "message": "Forbidden"
}
HttpException 생성자는 두 개의 argument를 담는데, 이는 response를 결정한다.
response argument는 JSON response body를 정의한다. 이는 string 혹은 object가 될 수 있다.
statusCode: status argument에 제공된 HTTP status code로 기본 설정된다.
message: status에 기반한 HTTP error의 짧은 설명이다.
JSON response body의 message를 덮어 쓰기 위해서는, string을 response argument에 공급하면 된다.
JSON response body를 전부 덮기 위해서는, response argument에 object를 전달하면 된다. Nest는 객체를 serialize하고 JSON response body 형태로 반환할 것 이다.
두 번째 argument인 status는 반드시 유효한 HTTP status code를 넣어야 하다. 가장 최고의 방법은 @nestjs/common의 HttpStatus enum을 넣는 것이다.
optional한 세 번째 argument, option은 error의 cause을 전달하는데 사용된다. 이 cause object는 response object로 직렬화 되지 않지만, HttpException에 의해 발생한 내부 error에 대한 정보를 보여주는 logging의 목적으로 유용하다.
{
  "status": 403,
  "error": "This is a custom message"
}
Custom Exceptions
많은 경우에, custom exception을 작성할 필요가없다. 단지 built-in 되있는 Nest HTTP exception을 쓰면된다. 만일 customized exception을 만들 필요가 있다면 제일 좋은 방법은 HttpException class를 상속받는 자신만의 exception을 만드는 것이다. Nest는 exception을 인식하고, 자동으로 error responses를 관리할 것이다.
base(built-in) exception filter는 자동적으로 많은 경우들을 다루지만, exception layer을 모두 제어하기를 원할 수 있다. 예를 들어 동적인 요소들에 근거한 다른 JSON schema를 사용하거나 log를 붙이기를 원할 수 있다. Exception filters는 이러한 목적을 위해 디자인되었다. 이 filter들은 제어의 흐름과, client로 반환되는 response의 내용을 정확하게 제어할 수 있다.
HttpException class의 instance인 exception을 잡고, 이를 위한 사용자 정의 응답 로직을 구현하는 exception filter를 만들 것이다. 이것을 위해, 기본 플랫폼의 Request와 Response 객체에 접근할 필요가 있다. Request 객체에 접근하고, 원래의 url을 빼내고, 이를 log 정보에 포함시킬 것이다. Response 객체를 이용하여 응답을 직접 제어하고 response.json() method를 사용하여 응답을 전송할 것이다.
import { ExceptionFilter, Catch, ArgumentsHost, HttpException } from '@nestjs/common';
import { Request, Response } from 'express';

// @Catch(HttpExeception):  HttpException 타입의 예외를 잡아 처리하는 필터임을 지정한다.
@Catch(HttpException)
// HttpExceptionFilter는 ExceptionFilter interface를 구현한다. 이는 'catch' method를 포함한다.
export class HttpExceptionFilter implements ExceptionFilter {
  // catch() : ExceptionFilter의 일부로, 예외가 발생했을 때 이를 처리하는 메서드. 예외를 잡아내고, 적절하게 처리하여 클라이언트에게 응답을 반환하는 역할
  // exception: 발생한 HttpException 객체이다.
  // host: ArgumentsHost 객체로, 여러 유형의 요청 컨텍스트를 캡슐화한다.
  // 요청 컨텍스트: 특정 요청에 대한 정보를 포함하는 객체로, 요청의 전체 생명 주기 동안 관련 데이터를 캡슐화한다.
  //     다음과 같은 정보를 갖는다.
  //         1. HTTP 요청/응답 객체: Express나 Fastify의 요청 및 응답 객체
  //         2. WebSocket 데이터: WebSocket 연결 및 메시지 데이터
  //         3. RPC 요청: 원격 프로시저 호출에 대한 요청 데이터
  catch(exception: HttpException, host: ArgumentsHost) {
    // HTTP 컨텍스트로 전환하여 express의 request, response 객체를 가져온다.
    const ctx = host.switchToHttp();
    const response = ctx.getResponse<Response>();
    const request = ctx.getRequest<Request>();
    // 예외 객체에서 HTTP 상태 코드를 가져온다.
    const status = exception.getStatus();

    // 상태 코드와 JSON 형식의 응답을 클라이언트에게 전송한다.
    response
      .status(status)
      .json({
        statusCode: status,
        timestamp: new Date().toISOString(),
        path: request.url,
      });
  }
}
<팁!> 모든 exception filter들은 모두 generic ExceptionFilter interface를 사용해야 한다. 이는 catch(exception: T, host: ArgumentHost) method에게 나타난 <T>를 제공해야한다. 여기서 T는 예외의 유형을 나타낸다.
<주의사항!> 만일 @nestjs/platform-fastify를 사용한다면, response.json() 대신 response.send()를 사용해야 한다.
@Catch(HttpException) decorator는 요구된 metadata와 exception filter를 묶어준다. exception filter는 Nest에게 이 특수한 filter는 HttpException 타입의 예외를 원한다고 말해줘야한다. @Catch() decorator는 한 개의 파라미터나, comma로 구분된 리스트를 받는다. 이는 한 번에 filter의 타입을 설정하도록 해준다.
Arguments Host
catch() 메서드의 parameter를 보자. exception parameter는 현재 처리되고 있는 exception object이다. host parameter는 ArgumentsHost 객체이다. ArgumentsHost는 강력한 utility object로, 나중에 execution context chapter*에서 더 자세히 설명할 것 이다. 이번 code sample에서는 원래의 요청 핸들러(예외가 발생한 controller)로 전달되는 Request 및 Response 객체에 대한 참조를 얻기 위해 이를 사용한다. 이 code sample에서는 _ArgumentsHost*_의 몇 가지 helper method를 사용하여 원하는 Reqeust 및 Response 객체를 가져왔다. ArgumentsHost
이 정도의 추상화(abstraction)를 사용하는 이유는 ArgumentsHost가 모든 context에서 작동하기 때문이다.(e.g. 지금 작업 중인 HTTP 서버 context뿐만 아니라, 마이크로서비스와 WebSockets도 포함된다.) execution context chapter에서는 ArgumentsHost와 그 helper 함수의 기능을 통해 모든 실행 컨텍스트에 대해 적절한 인자를 접근할 수 있는 방법을 살펴볼 것 이다. 이를 통해 모든 context에서 작동하는 일반적인 exception filter를 작성할 수 있다.
Binding filters
이제 우리의 HttpExceptionFilter를 CatsController의 create() method에 연결하자.
@UseFilter()는 하나의 filter instance를 받거나, comma로 구분된 filter instance를 받는다. 코드에는 위에 작성된 HttpExceptionFilter instance를 넣었다. 대신에 instance 대신 class를 전달하여 instance화 책임을 프레임워크에 맡기고, dependency injection을 가능케 할 수 있다.
<팁!> 가능하다면, instance 대신 class를 사용함으로써 filter를 적용하는 것을 선호하자. 이는 Nest가 전체 module에서 같은 class의 instance를 쉽게 재사용할 수 있기 때문이다. 곧, memory 사용에 있어 이점을 취한다.
위의 코드에서 method-scoped에서 HttpExceptionFilter는 오직 하나의 create() route handler가 적용됬다. exception filter들은 다른 수준에서 적용될 수 있다. controller, resolver, gateway, controller-scoped, global-scope 등등 예를 들어 controller에 적용하는 것은 아래와 같다.
@UseFilters(new HttpExceptionFilter())
export class CatsController {}
이 구성은 CatsController내에 정의된 모든 route handler에 대해 HttpExceptionFilter가 적용된다.
<주의사항!> useGlobalFilters() method는 gateway나 hybrid application에 대해 filter를 적용하지 못한다.
global-scopde filter는 모든 controller, route handler에 대해 application 전반적으로 사용된다. DI 측면에서 위의 useGlobalFilters() 와 같이, 어떤 모듈의 바깥에서 등록된 global filter은 dependency를 inject할 수 없다. 이는 any module의 context 바깥에서 완료됬기 때문이다. 이러한 문제를 해결하기 위해서는, any module에서 부터 바로 global-scope filter를 등록할 수 있다.
import { Module } from '@nestjs/common';
import { APP_FILTER } from '@nestjs/core';

@Module({
  providers: [
    {
      provide: APP_FILTER,
      useClass: HttpExceptionFilter,
    },
  ],
})
export class AppModule {}
이러한 접근 방식을 사용하여 filter에 대해 dependency inject을 수행할 때, 이 구성이 사용되는 module에 상관없이 filter는 실제로 global이라는 점에 유의해야 한다. 이 작업은 어디에서 수행되는가? filter(위의 경우 HttpExceptionFilter)가 정의된 모듈을 선택해야 한다. 또한 useClass는 custom provider registration을 처리하는 유일한 방법은 아니다. 자세히
많은 filter들을 이 기술로 추가할 수 있다. 간다히 각 provider array에 추가하기만 하면 된다.
Catch everything
모든 unhandled exception을 catch하기 위해, @Catch() decorator의 parameter를 비워두면 된다.
아래의 코드는 플랫폼과 무관하다. 왜냐하면 response를 처리하기 위한 HTTP adapter를 사용하고 Request, Response 따위의 플랫폼 종속 객체를 쓰지 않기 때문이다.
import {
  ExceptionFilter,
  Catch,
  ArgumentsHost,
  HttpException,
  HttpStatus,
} from '@nestjs/common';
import { HttpAdapterHost } from '@nestjs/core';

@Catch()
export class AllExceptionsFilter implements ExceptionFilter {
  // HttpAdapterHost를 주입받는다.
  constructor(private readonly httpAdapterHost: HttpAdapterHost) {}


  catch(exception: unknown, host: ArgumentsHost): void {
    // In certain situations `httpAdapter` might not be available in the
    // constructor method, thus we should resolve it here.
    // httpAdapter는 현재 애플리케이션에서 사용 중인 HTTP 서버 어댑터이다.
    //    1. 요청 URL 가져오기: httpAdapter.getReqeustUrl(req)
    //    2. 응답 보내기: httpAdapter.replay(res, body, statusCode)
    const { httpAdapter } = this.httpAdapterHost;

    const ctx = host.switchToHttp();

    const httpStatus =
      exception instanceof HttpException
        ? exception.getStatus()
        : HttpStatus.INTERNAL_SERVER_ERROR;

    // 응답으로 반환될 JSON 객체를 구성
    const responseBody = {
      statusCode: httpStatus,
      timestamp: new Date().toISOString(),
      // 현재 요청의 URL 경로를 얻기 위해 사용된다.
      path: httpAdapter.getRequestUrl(ctx.getRequest()),
    };

    httpAdapter.reply(ctx.getResponse(), responseBody, httpStatus);
  }
}
<주의사항!> 다양한 예외 필터를 조합하여 사용할 때, 모든 예외를 잡는 필터와 특정 타입에 바인딩된 필터를 함께 사용하는 경우, "모든 예외를 잡는" 필터를 먼저 선언해야 한다. 이렇게 해야 특정 필터가 바인됭 타입의 예외를 올바르게 처리할 수 있다.
import { Module } from '@nestjs/common';
import { APP_FILTER } from '@nestjs/core';
import { AllExceptionsFilter } from './filters/all-exceptions.filter';
import { SpecificExceptionFilter } from './filters/specific-exception.filter';

@Module({
  providers: [
    {
      provide: APP_FILTER,
      useClass: AllExceptionsFilter,
    },
    {
      provide: APP_FILTER,
      useClass: SpecificExceptionFilter,
    },
  ],
})
export class AppModule {}
Inheritance
일반적으로, application 요구사항을 충족시키기 위해 완전하 사용자 정의된 exception filter를 만든다. 하지만, 간단히 built-in default global exception fileter를 확장하고, 특정 요소에 따라 동작을 재정의하고자 할 때가 있을 수 있다.
예외 처리를 기본 필터에 위임하려면, BaseExceptionFilter를 확장하고, 상속받은 catch() method를 호출해야 한다. 아래와 같은 방식으로 기본 전역 예외 필터를 확장하고 커스터마이징하여 애플리케이션의 요구 사항에 맞게 사용할 수 있다.
import { Catch, ArgumentsHost } from '@nestjs/common';
import { BaseExceptionFilter } from '@nestjs/core';

@Catch()
export class AllExceptionsFilter extends BaseExceptionFilter {
  catch(exception: unknown, host: ArgumentsHost) {
    super.catch(exception, host);
  }
}
<주의사항!> BaseExceptionFilter를 확장한 Method-scoped와 Controller-scoped filter는 new를 이용해 instance화 되면 안된다. 대신에 framework가 이들을 자동으로 instance화하도록 해야 한다.
Global filter는 base filter를 확장할 수 있다. 이는 두 가지 방법으로 된다.
첫 번째 방법은 custom global filter를 인스턴스화할 때 HttpAdapter를 주입하는 것이다.
Middleware는 route handler가 호출되기 전에 실행되는 함수이다. NestJs에서는 middleware는 Express middleware와 동일한 기능을 가진다. NestJS에서 미들웨어는 요청과 응답 사이에 실행되는 함수. 요청을 처리하는 도중 특정 작업을 수행할 수 있게 한다. http 요청과 응답 사이 즉 라우터 핸들러 이전에 호출되는 함수이다. 다시 말해서 클라이언트 요청을 라우터 핸들러가 받기전에 가로채서 다른 작업을 수행할 수 있다.
다음과 같은 특징들이 있다.
요청에 대한 검증, 로깅, 인증, 권한 체크, 캐싱 등의 작업을 수행할 수 있다.
다수의 미들웨어 등록을 토해 다양한 작업을 순차적으로 처리할 수 있다.
next 함수 호출을 통해 미들웨어 체인을 연결한다. next 함수를 호출하면 다음 미들웨어가 실행되며, 호출하지 않으면 다음 미들웨어가 실행되지 않는다.
NestJS는 전역 미들웨어(Global Middleware)와 로컬 미들웨어(Local Middleware)를 지원한다. 전역 미들웨어는 모든 요청과 응답에 적용되며, 로컬 미들웨어는 특정 라우터에만 적용된다.
Middleware는 전에 route handler라고 불리던 함수이다. Middleware 함수는 request 그리고 response 객체에 접근한다. 그리고 application의 request-response cycle 에서의 next() middleware 함수에 접근한다. next middleware 함수는 보통 변수명 next로 표기된다.
next() 는 middleware function에서 중요한 역할을 하는 callback 함수이다. 이는 다음 middleware function이나 route handler로 제어를 넘기는 역할을 한다. 구체적으로는 다음과 같은 역할을 한다.
제어 흐름 유지: middleware function은 request와 response 객체에 접근할 수 있는데, next()를 호출하지 않으면 요청은 해당 middleware에서 멈추고, 이후의 middleware 함수나 route handler로 제어가 넘어가지 않는다.
middleware chain 형성: 여러 개의 middleware 함수가 존재할 때, next()를 사용하여 순서대로 미들웨어를 실행할 수 있다.
오류 처리: next(err)의 형태로 오류가 발생했음을 알릴 수 있다. 이 경우 프레임워크에서 오류 처리 middleware를 찾아서 실행하게 된다.
Nest middleware은 기본적으로 express middleware와 동등하다. 다음의 설명은 공식적인 'express'의 docs에서 가져온 것으로 middleware의 capability가 담겨있다.
Middleware function은 다음의 task를 수행할 수 있다.
    1. 임의의 code들을 실행할 수 있다.
    2. request, response object들을 변경할 수 있다.
    3. request-response cycle을 끝낼 수 있다.
    4. stack에서 다음 middleware function을 호출할 수 있다.
    5. 현재 middleware function가 request-response cycle을 종료하지 못하면,
        제어권을 다음 middleware function으로 넘기기 위해 반드시 next()를 호출해야한다.
        그렇지 않으면 request는 처리되지 않은 상태로 남게 된다.
custom Nest middleware는 함수로 구현하거나, @Injectable(). decorator가 있는 클래스로 구현할 수 있다. class의 경우 반드시 NestMiddleware interface를 구현해야 한다. 반면에 함수의 경우 다른 특별한 requirement는 없다. 이제 class method를 사용하여 간단한 middleware을 만들어보자
// 클래스 기반 미들웨어
import { Injectable, NestMiddleware } from '@nestjs/common';
import { Request, Response, NextFunction } from 'express';

@Injectable()
export class LoggerMiddleware implements NestMiddleware {
  // req: 요청 객체, res: 응답 객체, next: 다음 미들웨어를 호출
  // use method는 요청 정보를 출력하고, 응답 완료 후에는 응답 코드를 출력
  use(req: Request, res: Response, next: NextFunction) {
    console.log(`Request...`);
    // next를 통해 현재 미들웨어의 처리가 완료되었음을 알리고, 다음 미들웨어로 제어를 전달한다.
    // 이를 호출하지 앟으면 요청 처리가 중단된다.
    next();
  }
}

// 함수 기반 미들웨어
import { Request, Response, NextFunction } from 'express';

export function LoggerMiddleware(req: Request, res: Response, next: NextFunction) {
  console.log(`Request...`);
  next();
}
주의사항 'Express'나 'Fastify' 는 middleware를 다르게 처리하고, 또한 다른 method signature를 제공한다. read More
method signature: 메서드의 정의에서 메서드의 이름과 매개변수 리스트의 조합을 의미한다. 이는 오버로딩과 관련이 있다.
Dependency injection
Nest의 middleware는 DI를 지원한다. provider와 controller와 같이, 같은 module안에서 inject dependencies가 가능하다. 유사하게, constructor을 통해 수행된다.
Applying middleware
@Module() decorator안에는 middleware를 위한 공간은 없다. 대신에 module class의 configure() method를 통해 설정할 수 있다. middleware를 포함하는 Module은 반드시 NestModule interface를 구현해야 한다.
import { Module, NestModule, MiddlewareConsumer } from '@nestjs/common';
import { LoggerMiddleware } from './common/middleware/logger.middleware';
import { CatsModule } from './cats/cats.module';

@Module({
  imports: [CatsModule],
})
// middleware를 설정하기 위해 configure를 호출해야한다. 그러기 위해서는
// NestModule을 implements 해야한다.
export class AppModule implements NestModule {
  configure(consumer: MiddlewareConsumer) {
    consumer
      .apply(LoggerMiddleware)
      .forRoutes('cats'); // cats 경로에 적용한다.
  }
}
위에서는 /cats route handler 를 위한 LoggerMiddleware를 설정했다. 또한 middleware를 특정 request method에 제한 할 수 있는데, 이를 위해 middleware를 구성할 때 route path와 request method가 포함된 객체를 forRoutes() method에 전달하여 middleware를 구성할 수 있다. 아래의 코드에서 우리는 request method type을 참고하기 위해 RequestMethod enum을 import 하고 있다.
<팁!> configure() method는 async/await를 사용하여 asynchronous 하게 만들어졌다. configure() method는 NestJs 어플리케이션을 설정하는 데 사용되며, 이 method 안에서 비동기 작업을 수행할 수 있다. 예를 들어 db 연결 설정, 환경 변수 로드 등과 같은 작업을 configure() method 내부에서 비동기적으로 수행할 수 있다.
<주의사항> express adapter를 사용할 때, NestJS app은 기본적으로 package body-parser를 통해 json과 urlencoded을 등록할 것이다. 그렇기에 만일 MiddlewareConsumer를 통해 middleware를 customize를 한다면, NestFactory.create() 로 application을 만들 때 global middleware를 bodyParser flag를 false로 함으로써 꺼야 한다.
Route wildcard
route base의 Pattern들 또한 지원된다. 예를 들어 wildcard로써 asterisk(*)가 사용되고 또 어떤 문자의 조합과 매칭된다.
'ab*cd' route path는 'abcd', 'ab_cd', 'abecd' 과 매칭될 것이다. 이 밖에 ?, +, *, () 또한 route path에 사용된다. 그리고 이들은 regular expression의 짝이다. 단순히 hyphen(-), dot(.)은 문자로 해석된다.
<주의사항!> fastify package는 path-to-regexp package의 최신버전을 사용한다. 이는 더 이상 asterisk(*)를 지원하지 않는다. 대신,반드시 parameters를 사용해야 한다.(e.g. '(.*)', :splat*))
Middleware consumer
MiddlewareConsumer은 helper class이다. 이는 middleware를 관리하기 위한 내장 method를 제공한다. 모든 method는 fluent style 로 chained 된다. forRoutes() method는 single string, multiple stirngs, a RouteInfo object, a controller class, 심지어 multiple controller classes를 값으로 받을 수 있다. 보통은 comma(,)로 구분된 controller의 리스트를 전달한다.
//fluent style: 각 메서드 호출이 자신을 반환하여 다음 메서드를 바로 호출할 수 있게하는 코드 기법

consumer
  .apply(LoggerMiddleware)
  .forRoutes('cats')
  .apply(AnotherMiddleware)
  .forRoutes('dogs');
아래의 코드는 CatsController의 모든 route handler에 대해 middleware인 LoggerMiddleware를 적용한다는 의미이다.
import { Module, NestModule, MiddlewareConsumer } from '@nestjs/common';
import { LoggerMiddleware } from './common/middleware/logger.middleware';
import { CatsModule } from './cats/cats.module';
import { CatsController } from './cats/cats.controller';

@Module({
  imports: [CatsModule],
})
export class AppModule implements NestModule {
  configure(consumer: MiddlewareConsumer) {
    consumer
      .apply(LoggerMiddleware)
      .forRoutes(CatsController);// CatsController에 들어있는 route handler에 적용
  }
}
때때로 middleware의 적용에서 특정한 route를 제외(exclude) 할 수 있다. exclude() method를 통해 쉽게 route를 제외할 수 있다. 이 method는 single string, multiple strings, 또는 route를 나타내는 Route Info object 를 인자로 받아 route를 제외한다.
<팁!> exclude() method는 path-to-regexp package를 이용한 wildcard parameter를 지원한다.
위의 예에서, LoggerMiddleware는 CatsController 내부에 정의된 모든 route들을 둘러싼다. excpet에 적혀있는 것을 빼고.
Functional middleware
앞의 LoggerMiddleware class는 단순한 기능만 넣었다. member, method, dependency 다 없다. 그렇다면 class 대신에 간단한 function으로 작성할 수 있는데 이러한 middleware type을 functional middleware라고 한다. class 기반의 logger middleware를 functional middleware로 다꾸면 다음과 같다.
import { Request, Response, NextFunction } from 'express';

export function logger(req: Request, res: Response, next: NextFunction) {
  console.log(`Request...`);
  next();
};
global middleware에서 DI(Dependency Injection) 컨테이너에 접근하는 것이 불가능하다. 대신, app.use()를 사용할 때는 함수형 미들웨어를 사용할 수 있다. 또 다른 방법으로는 class 미들웨어를 사용하고, AppModule 내에서 .forRoutes('*')를 사용하여 모든 경로에 적용할 수 있다.