Nest decorator로 불리는 language feature로 build 됬다. Decorator는 programming language에서 흔히 사용되는 개념이다. 하지만 Javascript 세상에서는, 여전히 상대적으로 새로운 개념이다. 어떻게 decorator가 작동하는지 더 이해하기 위해서는, 다음을 기사를 추천한다.
ES2016 decorator는 함수를 반환하는 표현식이며, 대상, 이름, 속성 기술자를 인수로 받을 수 있다. 데코레이터를 적용하려면 데코레이터 앞에 '@' 문자를 붙이고 데코레이팅하려는 것의 맨 위에 배치한다. decorator는 class, method 또는 property를 위해 정의될 수 있다.
Param decorators
Nest는 HTTP route handler와 함께 사용할 수 있는 유용한 param decorator를 제공한다. 아래는 제공되는 Express, Fastify 객체를 쉽게 다를 수 있게 해주는 데코레이터 리스트이다.
@Decorator
object
description
@Reqeust(), @Req()
req
전체 요청 객체(req)를 주입한다.
@Response(), @Res()
res
전체 응답 객체(res)를 주입한다.
@Next()
next
next 함수를 주입한다. 미들웨어 함수에서 주로 사용된다.
@Session()
req.session
세션 객체를 주입한다.
@Param(param?: string)
req.params/ req.params[param]
URL 파라미터를 주입한다. param 인자를 제공하면 해당 파라미터의 값을 가져오고, 제공하지 않으면 모든 파라미터를 객체 형태로 가져온다
@Body(param?:string)
req.body/req.body[param]
요청 본문(body)을 주입한다. param 인자를 제공하면 해당 본문 필드의 값을 가져오고, 제공하지 않으면 본문을 객체 형태로 가져온다.
@Query(param?:string)
req.query/req.query[param]
쿼리 문자열을 주입한다. param 인자를 제공하면 해당 쿼리 파라미터의 값을 가져오고, 제공하지 않으면 모든 쿼리 파라미터를 객체 형태로 가져온다.
@Headers(param?:string)
req.headers/req.headers[param]
요청 헤더를 주입한다. param 인자를 제공하면 해당 헤더의 값을 가져오고, 제공하지 않으면 모든 헤드를 객체 형태로 가져온다.
@Ip()
req.ip
요청의 IP주소를 주입한다.
@Query
req.hosts
호스트 파라미터를 주입한다. 이는 요청의 호스트 정보를 가져온다.
추가적으로, custom decorators를 만들 수 있다.
node.js에서는 속성(properties)를 request object에 붙이는게 흔한 관행이다. 이런 속성을 route handler에서 extract할 수 있다.
const user = req.user;
code를 좀 더 readable하고 transparent하게 만들기 위해, @User() decorator를 만들고, 이를 controller 전반에 걸쳐 재사용할 수 있다.
만일 decorator의 기능이 조건적으로 이루어져야 한다면, 'data' 매개변수를 사용하여 데코레이터의 팩토리 함수에 인수를 전달할 수 있다. custom decorator를 사용하면 request object에서 특정 key에 해당하는 속성을 추출하여 route handler method에 주입할 수 있다. 이를 통해 코드의 가독성과 재사용성을 높일 수 있다. 예를 들어 authentication layer request의 유효성을 검사한다. 그리고 user entity에 request object를 붙인다. authenticated request의 user entity는 다음과 같을 것 이다.
name을 key로 갖는 decorator를 정의해보자. 이는 만일 존재한다면 관련된 value를 반환한다.(만일 존재하지 않거나 user object가 만들어져 있지 않다면 undefined를 반환한다.)
// user.decorator.ts
import { createParamDecorator, ExecutionContext } from '@nestjs/common';

export const User = createParamDecorator(
  (data: string, ctx: ExecutionContext) => {
    const request = ctx.switchToHttp().getRequest();
    const user = request.user;

    // user에서 data에 해당하는 정보가 있다면 그것을 반환
    // 그렇지 data가 지정되지 않았다면 user 객체를 반환
    return data ? user?.[data] : user;
  },
);

// 사용
import { Controller, Get } from '@nestjs/common';
import { User } from './user.decorator'; // 경로는 실제 파일 위치에 따라 다릅니다.

@Controller('profile')
export class ProfileController {
  @Get()
  getProfile(@User() user: any) {
    // 전체 사용자 객체 반환
    console.log(user);
    return user;
  }

  @Get('email')
  getUserEmail(@User('email') email: string) {
    // 사용자 이름만 반환
    console.log(email);
    return email;
  }
}
controller에서 @User() decorator를 통해 어떻게 특정한 property에 접근하는가?
위의 같은 decorator, 허나 다른 key로 다른 property에 접근할 수 있다. 사용자 객체가 깊거나 복잡한 경우, 이 방법을 통해 request handler 구현을 더 쉽게 만들고 가독성을 높일 수 있다.
<팁!> Typescript 사용자는 createParamDecorator()가 제네릭이라는 점에 주목해야 한다.이를 통해 타입 안전성을 명시적으로 보장할 수 있다. (e.g. createParamDecorator((data, ctx)=> ... )) 또는 factory function에서 매개변수 타입을 지정할 수도 있다. (e.g. createParamDecorator((data:string, ctx)=> ...)) 만일 둘다 생략하면 data의 타입은 any이다.
factory function: 객체를 생성하는 함수. 객체의 생성과 초기화를 담당하며, 동일한 함수로 다양한 형태의 객체를 만들 수 있는 유연성을 제공한다.
Working with pipes
Nest는 기본 내장된 @Body(), @Param(), @Query()에서 처리하는 것과 같은 방식으로 custom param decorator를 처리한다. 이는 pipe는 custom annotated parameter에서도 실행된다는 걸 의미한다. (e.g. 위의 user argument ) 게다가, pipe를 바로 custom decorator에 apply할 수 있다. 그냥 custom decorator에도 pipe가 적용된다는 걸 뜻한다.
<팁!> validateCustomDecorator 옵션은 반드시 true로 설정되어야 한다. ValidationPipe는 default로 custom decorator로 주석이 달린 인수를 검증하지 않는다.
Decorator composition
Nest는 mutiple decorator를 구성할 수 있도록 helper method를 제공한다. 예를 들어, authentication과 관련된 모든 decorator를 하나의 decorator로 combine하기를 원한다고 하자. 이는 다음과 같은 구성으로 완료된다.
Interceptor는 NestInterceptor interface를 구현하고 @Injectable() decorator가 주석으로 달린 class이다.
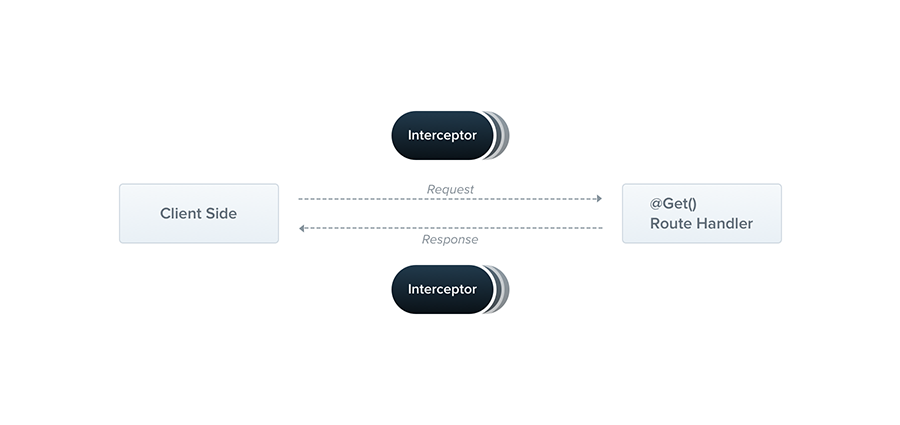
Interceptor는 들어오는 요청(reqeust)와 나가는 응답(response)을 가로채고, 이들 사이에서 추가적인 로직을 실행할 수 있도록 하는 강력한 기능을 제공한다. 인터셉터는 다음과 같은 여러 용도로 사용될 수 있다.
    - 로깅(Logging): 요청 및 응답 정보를 기록
    - 변환(Transformation): 응답 데이터를 특정 형식으로 변환
    - 캐싱(Caching): 반복적인 요청에 대해 캐시된 응답을 제공한다.
    - 에러 처리(Error Handling): 특정한 에러를 처리하거나 에러 메시지를 변환한다.
    - 타이밍(Timing): 요청 처리 시간을 측정한다.
1. Middleware: 모든 미들웨어가 순차적으로 실행된다.
2. Guard: 요청을 처리할 수 있는지 확인하는 모든 가드가 실행된다.
3. Interceptor(전처리): 요청 전처리를 수행하는 모든 인터셉터가 실행된다
4. Pipe: 입력 데이터의 변환 및 유효성 검사를 수행하는 모든 파이프가 실행된다.
5. Controller Handler: 컨트롤러의 핸들러 메서드가 실행된다.
6. Pipe(응답 데이터 변환): 컨트롤러 핸들러가 반환한 데이터를 변환하는 파이프가 있을 경우 실행된다.
7. Interceptor(후처리): 요청 후처리를 수행하는 모든 인터셉터가 실행된다.
AOP: OOP와 같은 방식으로 소프트웨어 모듈화를 목표로 하는 프로그래밍 패러다임이다. 주로 관심사의 분리(Separation of Concerns)를 통해 코드의 재사용성과 유지보수성을 높이는 데 중점을 둔다.
method 실행의 전, 후 로직을 묶는다.
function으로 부터 반환된 result를 바꿈
function으로 부터 던져진 exception을 바꿈
basic fucntion들의 기능 추가
특정 조건에 따라 function을 override 하는 것
Basics
각 interceptor는 intercept() method를 구현한다. 이는 두 개의 argument를 받는다. (ExecutionContext, CallHandler) ExecutionContext의 instance이다.(Guards에서의 object과 동일하다.) ExecutionContext는 ArgumentsHost를 상속받는다. 이전의 exception filter chapter에서 ArgumentHost를 살펴보았다. 이것은 original handler에 전달된 arguments들의 wrapper이며, application의 type에 따라 다양한 arguments array를 포함하고 있음을 보았다. 자세한 사항은 exception filters 살펴봐라.
ArgumentHost: 원래 handler에 전달된 argument를 래핑하는 객체로, 어플리케이션의 타입에 따라 다양한 인수 배열을 포함한다.
        이를 통해, request handler에 전달된 모든 인수를 쉽게 접근할 수 있다.
    1. getArgs() : 원래의 핸들러에 전달된 모드 인수 배열을 반환
    2. getArgByIndex(index:number): 특정 인덱스의 인수를 반환
    3. switchToHttp(): Http 컨텍스트로 전환하여 HTTP 요청 및 응답 객체에 접근할 수 있다.
    4. swtichToWs(): WebSocket 컨텍스트로 전환하여 WebSocket 요청 및 응답 객체에 접근할 수 있다.
ExecutionContext: 'ArgumentsHost'를 확장한 인터페이스로, 주로 가드와 인터셉터에서 사용된다.
    1. getClass(): 현재 처리 중인 클래스(controller)를 반환한다.
    2. getHandler(): 현재 처리 중인 핸들러(method)를 반환한다.
    3. getType(): 현재 실행 컨텍스트의 유형을 반환한다.(HTTP, RPC, WebSocket)


ArgumentHost와 ExecutionContext의 주요 정보
1. HTTP 컨텍스트(Express 사용 시)
    - Request: Express의 요청 객체로, 요청된 URL, 헤더, 본문, 쿼리 파라미터 등을 포함한다.
    - Response: Express의 응답 객체로, 응답을 작성하고 반환하는데 사용된다.
    - Next: (옵션) 미들웨어 체인의 다음 함수로, 일반적으로 사용은 안됨
2. 메서드 및 클래스 정보
    - Handler: 현재 실행 중인 핸들러 메서드
    - Class: 현재 실행 중인 클래스(컨트롤러)
Execution context
ArgumentsHost, ExecutionContext를 extending함으로써 현재 execution process에 대해 추가정보를 제공하는 새로운 helper method들을 추가할 수 있다. 이러한 정보들은 controller, method, execution context를 걸쳐 좀더 generic interceptor를 build하는데 도움된다. ExecutionContext
Call handler
NestJs에서의 interceptor는 request를 가로채어 특정 로직을 실행할 수 있다. 인터셉터의 intercept() method는 두 개의 인자를 받는다. ExecutionContext와 CallHandler. CallHandler의 'handle()' method는 rotue handler method를 호출하는 데 사용된다. 만약 handle() method를 호출하지 않으면, request가 route handler로 전달되지 않고, 해당 route handler method는 실행되지 않는다.
이러한 접근은 intercept() method는 효과적으로 request/response streamdmf 감싼다. 결과대로, 마지막 route handler의 실행 전/후 둘다 custom logic를 실행할 것 이다. intercept() method가 handle() 이 호출되기 전에 실행된다. 하지만 후에 어떻게 영향을 주는가? handle() method가 Observable를 return 하기 때문에, 우리는 강력한 RxJS operator를 사용하여 response를 조작할 수 있다. Aspect Oriented Programming 기술을 사용하면, route handler의 호출(즉, handle() 호출)은 Pointcut이라고 하며 이 지점에서 추가 로직이 삽입 된다.
RxJS: 이벤트나 비동기, 시간을 마치 Array 처럼 다룰 수 있게 만들어 주는 라이브러리
예를 들어, POST /cats request가 들어온다고 가정하자. request는 CatsController안에 정의된 create() handler method로 향할 것이다. interceptor가 handle() method를 호출하지 않으면, 그 경로상의 어느 곳에서든 create() method가 실행되지 않을 것 이다. 한번 handle()이 호출되면(이는 Observable을 반환할 것 이다.) create() handler가 트리거된다. 그리고 Observable를 통해 응답 스트림이 수신되면, 그 스트림에 추가 작업을 수행하고 최종 결과를 호출자에게 반환할 수 있다.
Aspect interception
NestJs에서 인터셉터를 사용하여 사용자 상호작용을 logging 할 수 있다. 예를 들어, 사용자의 호출을 저장하거나, 비동기적으로 이벤트를 디스패치하거나, 타임스탬프를 계산할 수 있다. 아래는 간단한 LoggingInterceptor이다.
import { Injectable, NestInterceptor, ExecutionContext, CallHandler } from '@nestjs/common';
import { Observable } from 'rxjs';
import { tap } from 'rxjs/operators';

// pipe
// RxJS의 주요 연산자 중 하나로, Observable의 데이터를 처리하기 위해 다양한 연산자를 연결
// 할 수 있는 메서드이다. pipe를 사용하면 데이터를 변환하거나, 필터링하거나, 부수 효과를 추가하는
// 등의 작업을 체인 방식으로 적용할 수 있다.

// tap
// RxJS의 연산자 중 하나로, Observable 데이터 스트림을 변경하지 않고, 부수 효과(side effect)를 추가
// 할 수 있게 해준다. 주로 디버깅, 로깅, 데이터 수집 등의 목적으로 사용된다.
// tap 연산자는 스트림에 있는 각 데이터 항목에 대해 지정된 함수를 호출한다.

@Injectable()
export class LoggingInterceptor implements NestInterceptor {
  intercept(context: ExecutionContext, next: CallHandler): Observable<any> {
    // route handler 전
    console.log('Before...');

    const now = Date.now();
    // next: CallHandler 인터페이스를 구현한 객체로, 실제 컨트롤러의 핸들러 메서드를 호출하는 handle method를 제공한다.
    // next.handle(): 핸들러 메서드를 호출하고, Observable을 반환한다.
    return next
      .handle()
    // route handler 후
      .pipe(
        tap(() => console.log(`After... ${Date.now() - now}ms`)),
      );
  }
}
<팁!>
NestInterceptor<T,R> 는 generic interface이다. T는 Observable<T>의 타입을 나타낸다. 요청 핸들러가 반환하는 데이터 스트림의 타입을 나타낸다. 즉, 라우트 핸들러 메서드가 반환하는 데이터 타입 이다. R는 Observable<R>에 의해 감싸진 값의 타입을 말한다. 인터셉터가 반환하는 최종 데이터 타입이다. 인터셉터가 응답 데이터를 어떻게 변형할지를 정의한다.
<주의사항!> interceptor는 controller, provider, guard와 동일하게 constructor를 통해 dependency를 inject한다.
handle() 은 RxJS Observable를 반환하기 때문에, 우리는 다양한 RxJS 연산자를 사용하여 stream을 조작할 수 있다. 이를 통해, response data에 추가적인 로직을 적용하거나, 데이터를 변환하고, 부수 효과를 추가할 수 있다. 위의 예에서 tab() 연산자를 사용했다. 이는 Observable 스트림이 정상적으로 완료되거나 예외가 발생할 때 익명 로깅 함수를 호출한다. 그러나 response cycle에는 영향을 미치지 않는다. 이는 주로 디버깅, 로깅, 또는 부수효과를 추가하는 용도로 사용된다.
Binding interceptor
interceptor를 설정하기 위해서는 @nestjs/common에서 @UseInterceptors() decorator를 사용한다. pipe, guards와 마찬가지로interceptor는 또한 controller, method, global scope로 설정할 수 있다.
@UseInterceptors(LoggingInterceptor)
export class CatsController {}
위의 구조로, CatsController안에 정의된 모든 route handler들은 LogginInterceptor를 사용할 수 있다. 만일 GET /cats endpoint가 호출된다면, 다음과 같은 output을 얻을 수 있다.
Before...
After... 1ms
instance가 아닌 LogginInterceptor class 를 전달했다. 이는 instantiation과 dependeny injection 책임을 framework에게 넘겨준다. pipe, guard, exception filter과 동일하게, 또한 instance를 넘겨줄 수 있다.
@UseInterceptors(new LoggingInterceptor())
export class CatsController {}
앞서 언급한 대로 위의 구조는 controller에 선언된 모든 handler에 interceptor를 붙인다. 만일 interceptor의 범위를 single method로 좁히고 싶다면, 간단히 method level로 적용하면 된다.
만일 global interceptor를 설정하고 싶다면, useGlobalInterceptors() method를 사용한다.
global interceptor는 모든 controller, route handler를 걸친 application에 사용된다. dependency injection면에서, 위의 예 처럼, useGlobalInterceptors()를 사용하여 module 바깥에서 등록된 global interceptor는 dependency를 inject할 수 없다. 왜냐하면 module의 외부에서 inject가 이루어 졌기 때문이다. 이러한 문제를 해결하기 위해서는 다음과 같은 구조로 interceptor를 module 에서 바로 설정하면 된다.
import { Module } from '@nestjs/common';
import { APP_INTERCEPTOR } from '@nestjs/core';

@Module({
  providers: [
    {
      provide: APP_INTERCEPTOR,
      useClass: LoggingInterceptor,
    },
  ],
})
export class AppModule {}
<팁!> 이 접근 방식을 사용하여 interceptor에 대한 dependency inject를 수행할 때, 이 구성이 사용되는 모듈에 관계없이 interceptor는 실제로 전역적임을 유의해야 한다. 이는 intercepter(위의 경우 LogginInterceptor)가 정의된 모듈을 선택해야 한다. 또한 'useClass'는 custome provider 등록을 처리하는 유일한 방법이 아니다. 자세히
Response mapping
handle() method는 Observable를 반환한다. stream에는 route handler에서 반환된 value를 포함한다. 그리고 즉, 이는 RxJS의 map() operator를 통해 쉽게 변경할 수 있다. map() 연산자는 Observable의 각 값을 변환하여 새로운 값으로 반환한다. 이를 통해 응답 데이터를 변형하거나 추가적인 로직을 적용할 수 있다.
<주의사항!> response mapping feature은 라이브러리별 response strategy(즉, '@Res() obejct를 직접 사용하는 것')와 함께 작동하지 않는다.
TransformInterceptor를 만들자. 이는 process를 보여주기 위해 각 response를 간단하게 변형한 것 이다. 이는 response object를 새롭게 만들어진 object의 data 속성에 할당하기 위해 RxJS의 map() 연산자를 사용할 것 이다. 이렇게 만들어진 object는 client에게 반환될 것 이다.
import { Injectable, NestInterceptor, ExecutionContext, CallHandler } from '@nestjs/common';
import { Observable } from 'rxjs';
import { map } from 'rxjs/operators';

// 응답 데이터의 구조를 정의
export interface Response<T> {
  data: T;
}

@Injectable()
//<T, Response<T>>
//    T: 인터셉터가 처리할 입력 데이터의 타입을 나타냄
//    Response<T>: 인터셉터가 반환할 출력 데이터의 타입을 나타냄
export class TransformInterceptor<T> implements NestInterceptor<T, Response<T>> {
  // context: 현재 실행 컨텍스트를 나타냄, 요청 및 응답 객체에 접근할 수 있다.
  // next: CallHandler 인터페이스를 구현한 객체로, 실제 컨트롤러의 핸들러 메서드를 호출하는 handle 메서드를 제공
  intercept(context: ExecutionContext, next: CallHandler): Observable<Response<T>> {
    return next.handle().pipe(map(data => ({ data })));
  }
}

// 사용
import { Controller, Get, UseInterceptors } from '@nestjs/common';
import { TransformInterceptor } from './transform.interceptor';

@Controller('cats')
@UseInterceptors(TransformInterceptor)
export class CatsController {
  @Get()
  findAll() {
    return [{ name: 'Tom' }, { name: 'Jerry' }];
  }
}
Nest 인터셉터는 동기와 비동기 모두에서 작동한다. 필요에 따라 메서드를 간단히 async로 변경할 수 있다.
위의 구조에서 만일 GET /cats endpoints로 호출했을 때, response는 다음과 같은 결과를 도출할 것 이다.
{
  "data": []
}
인터셉터는 어플리케이션 전체에서 발생하는 요구 사항에 대한 재사용 가능한 솔루션을 만드는데 큰 가치를 제공한다.
예를 들어, null값을 빈 문자열("")로 변환해야 한다고 가정해보자. 한 줄의 코드로 이를 수행할 수 있으며, 인터셉터를 전역적으로 바인딩하여 등록된 각 핸들러에서 자동으로 사용되도록 할 수 있다.
import { Injectable, NestInterceptor, ExecutionContext, CallHandler } from '@nestjs/common';
import { Observable } from 'rxjs';
import { map } from 'rxjs/operators';

@Injectable()
export class ExcludeNullInterceptor implements NestInterceptor {
  intercept(context: ExecutionContext, next: CallHandler): Observable<any> {
    return next
      .handle()
      .pipe(map(value => value === null ? '' : value ));
  }
}
Exception mapping
다른 RxJS의 catchError() 연산자는 thrown exception을 override할 수 있다.
import {
  Injectable,
  NestInterceptor,
  ExecutionContext,
  BadGatewayException,
  CallHandler,
} from '@nestjs/common';
import { Observable, throwError } from 'rxjs';
import { catchError } from 'rxjs/operators';

@Injectable()
export class ErrorsInterceptor implements NestInterceptor {
  intercept(context: ExecutionContext, next: CallHandler): Observable<any> {
    return next
      .handle()
      .pipe(
          // 핸들러 메서드에서 발생한 에러를 가로채고, 이를 BadGatewayException으로 변환
        catchError(err => throwError(() => new BadGatewayException())),
      );
  }
}
Stream overriding
때때로 완전히 handler의 호출을 막고, 대신에 다른 값을 반환하기를 원하는 이유가 몇 있다. 명백한 예는 response time을 항샹시키기 위해 cache를 구현하는 것 이다. 간단한 simple cache interceptor를 보자. 이는 cache로 부터 interceptor의 response를 반환한다. cache interceptor를 사용하면 response time을 개선하기 위해 cached data를 반환할 수 있다. cache interceptor는 request에 대한 response를 cache하고, 동일한 request가 들어올 때 cached된 데이터를 반환하여 서버의 부담을 줄일 수 있다. 현실적인 예로, 우리는 TTL, cache invalidation, cache size...와 같은 다른 요소들을 고려해야 하지만, 이는 이 논의의 범위를 벗어난다. 여기서 main concept에 를 보여주는 간단한 예시가 있다.
import { Injectable, NestInterceptor, ExecutionContext, CallHandler } from '@nestjs/common';
import { Observable, of } from 'rxjs';

@Injectable()
export class CacheInterceptor implements NestInterceptor {
  intercept(context: ExecutionContext, next: CallHandler): Observable<any> {
    const isCached = true;
    if (isCached) {
      return of([]);
    }
    return next.handle();
  }
}
위에서 CacheInterceptor는 하드코딩된 isCached 변수와 하드코딩된 [ ]을 가진다. 여기서 핵심 포인트는 RxJS의 of() 연산자로 인해 생성된 new stream을 반환하는 것 이다. 그러므로, route handler는 호출되지 않는다. 누군가 CacheInterceptor를 사용하는 endpoint를 호출하면, response(하드코딩된 빈 배열)이 즉시 반환된다. 일반적인 해결책으로는, Reflector를 사용하여 새로운 custom decorator을 만드는 것 이다. reflector
More operators
RxJS operator를 사용하여 stream을 조작하는 것은 많은 가능성을 제공해 준다. 흔한 use case를 생각해보자. 만일 route requests에서 timeouts를 handle하고 싶다고 하자. 만일 특정 시간이 지난 후에도, endpoint가 아무것도 반환하지 않으면 error response로 종료하고 싶을 수 있다. 다음 코드는 이러한 기능을 구현하는 방법을 보여준다.
import { Injectable, NestInterceptor, ExecutionContext, CallHandler, RequestTimeoutException } from '@nestjs/common';
import { Observable, throwError, TimeoutError } from 'rxjs';
import { catchError, timeout } from 'rxjs/operators';

@Injectable()
export class TimeoutInterceptor implements NestInterceptor {
  intercept(context: ExecutionContext, next: CallHandler): Observable<any> {
    return next.handle().pipe(
      // 요청이 5초 내에 완료되지 않으면 TimeoutError를 발생
      timeout(5000),
      catchError(err => {
        if (err instanceof TimeoutError) {
          return throwError(() => new RequestTimeoutException());
        }
        return throwError(() => err);
      }),
    );
  };
};
5초 후에, request processing은 취소될 것 이다. RequestTimeoutException이 던져지기 전에 custom logic또한 추가할 수 있다.
guard는 CanActivate interface를 implement하는 @Injectable() decorator이 붙은 class이다.
//Middleware
//    역할: 요청과 응답 사이의 모든 것을 처리. 주로 로깅, 인증, 요청 변환에 사용
//    적용: 모든 경로에 대해 전역적으로 적용되거나 특정 경로에 대해 적용될 수 있다.
//    순서: 요청 수신 직후 실행된다.
import { Injectable, NestMiddleware } from '@nestjs/common';
import { Request, Response, NextFunction } from 'express';

@Injectable()
export class LoggerMiddleware implements NestMiddleware {
  use(req: Request, res: Response, next: NextFunction) {
    console.log('Request...');
    next();
  }
}

//Guard
//    역할: 요청이 컨트롤러 핸들러로 들어가기 전에 특정 조건(주로 인증/권한)을 확인하고, 접근을 허용할지 결정한다.
//    적용: 전역, 컨트롤러, 또는 특정 핸들러에 대해 적용될 수 있다.
//    순서: 미들웨어 이후에 실행된다.
import { Injectable, CanActivate, ExecutionContext } from '@nestjs/common';

@Injectable()
export class AuthGuard implements CanActivate {
  canActivate(context: ExecutionContext): boolean {
    const request = context.switchToHttp().getRequest();
    return validateRequest(request);
  }
}

//Pipe
//    역할: 요청 데이터를 변환하고 검증한다.
//    적용: 특정 매개변수, 컨트롤러 메서드, 또는 전역적으로 적용될 수 있다.
//    순서: 가드 이후, 컨트롤러 핸들러에 전달되기 전에 실행된다.
import { PipeTransform, Injectable, ArgumentMetadata, BadRequestException } from '@nestjs/common';

@Injectable()
export class ParseIntPipe implements PipeTransform<string, number> {
  transform(value: string, metadata: ArgumentMetadata): number {
    const val = parseInt(value, 10);
    if (isNaN(val)) {
      throw new BadRequestException('Validation failed');
    }
    return val;
  }
}
Guard는 single responsibility를 가진다. 이들은 주어진 request가 route handler에 다뤄질 것인지 아닐 지를 결정한다. (permission, role, ACLs. etc에 의거하여) 이는 종종 authorization, authentication으로 사용된다. Authorization(authentication)은 전통적인 Express application에서는 middleware에 의해 다뤄진다. middleware는 authentication에서는 괜찮은 선택이다. token 검증이나 request object에 속성을 붙이는 작업은 특정 rotue context(및 그 메타데이터)와 강하게 연결되어 있지 않기 때문이다.
허나 middleware은 멍청하다. next() function 호출 이후에 어떤 handler가 실행됬는지 알지 모른다. 반면에 Guard는 ExecutionContext instance에 접근한다. 즉, 바로 다음에 무엇이 실행될지 정확하게 안다. exception filter, pipe, 그리고 interceptor과 같이 guard는 request/response cycle의 정확한 지점에서 처리 로직을 선언적으로 삽입할 수 있도록 설계되었다. 이것은 code를 DRY하고 선언적으로 만들어 준다.
ExecutionContext: API 요청이 서버에 도달하면, NestJS는 이 요청에 대한 정보를 ExecutionContext 객체에 캡슐화한다.
    이 컨텍스트 객체는 요청의 세부 사항을 포함하며, 이를 통해 Guard, Interceptor, Pipe, Exeception Filter 등이 요청을 처리할 수 있다.
    1. 현재 실행 컨텍스트 정보 제공
        - 요청 객체, 응답 객체, 컨트롤러 및 핸들러 메서드에 대한 정보를 제공한다.
        - Guard, Interceptor, Filter, Pipe 등이 이 정보를 활용하여 특정 로직을 실행할 수 있다.
    2. 상황별 분기 처리
        - HTTP, WebSocket, RPC(Remote Porcedure Call) 등 다양한 프로토콜에 대해 적절한 컨텍스트를 제공한다.
        - 각 프로토콜에 맞는 요청 처리를 구현할 수 있다.
<팁!> Guards는 모든 middleware 이후에, 그리고 intercepter or pipe 이전에 실행된다.
Authorization guard
언급한대로, authorization은 Guard를 쓰는 대표적인 시스템이다. 왜냐하면 caller(보통 authenticated user)가 충분한 permission을 가질 때 특정한 route를 호출할 수 있어야 하기 때문이다. AuthGuard authenticated user를 짐작한다.(request header에 token이 붙어있는) Guard는 token을 추출하고 검증할 것이다. 그리고 추출된 정보를 사용하여 request가 처리될지 말지를 결정한다.
import { Injectable, CanActivate, ExecutionContext } from '@nestjs/common';
import { Observable } from 'rxjs';

@Injectable()
// AuthGuard가 CanActivate를 구현하여 가드로써 동작할 수 있다.
export class AuthGuard implements CanActivate {
  // canActivate 메서드는 요청이 특정 경로에 접근할 수 있는지 여부를 결정한다.
  // context: 현재 요청의 실행 컨텍스트를 나타내는 ExecutionContext 객체
  // boolean, Promise<boolean>, Observable<boolean> 중 하나를 반환하여 요청이 허용될지 여부를 결정한다.
  canActivate(
    // 현재 요청의 실행 컨텍스트를 나타내는 ExecutionContext 객체
    context: ExecutionContext,
  ): boolean | Promise<boolean> | Observable<boolean> {
    const request = context.switchToHttp().getRequest();
    // 주어진 요청 객체의 유효성을 검증하는 역할을 한다.
    // 이 함수는 사용자 정의 함수이며, 주로 요청이 적절한 인증 및 권한을 가지고 있는지 확인하는 데 사용된다.
    // e.g. JWT 토큰의 유효성 검사. 사용자 권한 확인 등을 포함할 수 있다.
    return validateRequest(request);
  }
}
실행 컨텍스트
API 요청이 서버에 도달하면, NestJS는 이 요청에 대한 정보를 ExecutionContext 객체에 캡슐화한다. 이 Context 객체는 요청의 세부 사항을포함하며, 이를 통해 Uard, Interceptor, Pipe, Exception Filter 등이 요청을 처리할 수 있다.
<팁!> 만일 이러한 검증 시스템이 어떤 메커니즘으로 돌아가는지 알고 싶다면, 이 챕터를 찾아가라. 마찬가지로 정교한 authorization example를 확인하고 싶다면 이 챕터를 참고하라.
validateRequest() function의 내부 로직은 simple하거나 정교할 수 있다. 이번 예제의 핵심 포인트는 어떻게 guard가 reqeust/response cycle에서 동작하는가 이다.
모든 guard는 반드시 canActivate() 함수를 구현해야 한다. 이 함수는 현재 request가 허용할지 말지를 나타내는 boolean값을 return 해야한다. 그리고 synchronously 또는 asynchronously 한지에 대한 response를 반환할 수 있다.(Promise 또는 Observable을 통해) Nest는 next action을 제어하기 위해 return value를 사용해야 한다.
만일 true를 반환하면 request가 처리되야 함
만일 false를 반환하면 request를 거절해야함
Execution context
canActivate() function은 single argument, ExecutionContext instance를 받는다. ExecutionContext는 ArgumentsHost를 상속받는다. 우리는 ArgumentsHost는 이전 filter chapter에서 다루었다. 위의 sample에서, ArgumentsHost에 정의된 동일한 helper method를 사용하여 request 객체에 대한 참조를 얻고 있다. exception filters의 Arguments host section에서 더 자세히 알 수 있다.
ArgumentsHost를 확장함으로써, ExecutionContext 또한 몇 개의 새로운 helper methods를 추가할 수 있다. 이들은 현재 실행중인 process에 대한 추가 detail들을 제공한다. 이러한 detail들은 좀더 generic한 guard를 설계하는데 유용하다. guard들은 controllers, methods 그리고 execution context에 걸쳐서 사용된다. ExecutionContext에 대한 자세한 설명
ArgumentsHost
    - 다양한 유형의 핸들러(HTTP, RPC, WebSocket 등)에 대해 인수를 가져오는 데 사용된다.
    - 파이프, 인터셉터, 예외 필터 등에서 인수를 다루는 데 사용된다.
    주요 메서드
        1. getArgs(): 인수 배열을 반환한다.
        2. getArgByIndex(index: number): 특정 인수를 반환한다.
        3. switchToHttp(): HTTP 컨텍스트로 전환한다.
        4. swtichToRpc(): RPC 컨텍스트로 전환한다.
        5. switchToWs(): WebSocket 컨텍스트로 전환한다.

ExecutionContext
    - ArgumentsHost를 확장하여 실행 컨텍스트에 대한 더 많은 정보를 제공한다.
    - 현재 실행 중인 컨텍스트(컨트롤러, 핸들러 등)에 대한 추가 메타데이터를 제공한다.
    - 주로 가드와 인터셉터에서 컨트롤러와 핸들러 수준의 정보를 다루는데 사용
    주요 메서드
        1. getClass(): 현재 실행 중인 클래스(컨트롤러)를 반환한다.
        2. getHandler(): 현재 실행 중인 핸들러(메서드)를 반환한다.
        3. getType(): 현재 실행 중인 컨텍스트 타입을 반환한다.
Role-based authentication
이제 좀더 기능적인 특정한 규칙을 통해 허락된 유저만 가능토록하는 기능적인 guard를 설계해보자. 일단 먼저 basic guard template로 시작한다. 아래의 코드는 all request가 처리되도록 허용한다.
pipe나 exception filter와 같이, guard는 controller-scoped, global-scoped가 될 수 있다. 아래에서는 @UseGuards() decorator를 사용하여 controller-scoped guard를 설정했다. 이 decorator는 single argument, 혹은 comma-separated list of arguments가 받는다. 이는 한번의 선언(declaration)으로 적절한 guard set이 적용되도록 한다.
@Controller('cats')
@UseGuards(RolesGuard)
export class CatsController {}
<팁!> @nestjs/common package를 통해 @UseGuards()를 import한다.
위에서 RolesGuard class를 전달한다.(instance가 아닌), 이는 framework에게 instance화의 책임을 넘기고 DI를 가능케 한다. pipe와 exception filter와 비슷하게, instance를 넘겨줄 수 있다.
@Controller('cats')
@UseGuards(new RolesGuard())
export class CatsController {}
위의 구조는 controller에 선언된 모든 handler는 guard가 붙여진다. 만일 single method에 guard가 붙여지길 원한다면, 우리는 @UseGuards() decorator를 method level에서 적용할 수 있다.
global guard를 설정하기 위해서, Nest application instance의 useGlobalGuards() method를 사용할 수 있다.
hybrid App의 경우 useGlobalGuards() method는 gateway나 micro service에 guard() 설정하지 못한다.(만일 바꾸고 싶다면 Hybird application 참고) "standard"(non-hybird) microservice app의 경우, useGlobalGuard()는 guard를 global하게 마운트된다.
Global guard의 경우 전체 application, 모든 controller, 모든 route handler에 사용된다. Dependency injection 관점에서, module(위의 코드 처럼 useGlobalGuards())의 바깥에서 global guards는 dependency를 inject하지 못한다. 왜냐하면 이는 모듈의 바깥에서 이루어졌기 때문이다. 이러한 문제를 해결하기 위해, 다음과 같은 방식으로 module에서 바로 guard를 설정하면 된다.
import { Module } from '@nestjs/common';
import { APP_GUARD } from '@nestjs/core';

@Module({
  providers: [
    {
      provide: APP_GUARD,
      useClass: RolesGuard,
    },
  ],
})
export class AppModule {}
<팁!> guard에 대해 이러한 방식으로 dependency injection을 사용할 때, 이러한 구성이 사용되는 모듈에 관계없이 실제로 전역적이라는 점에서 유의해야한다. 어디서 이 작업을 수행할까? guard(위의 예제에서 정의된 RolesGuard)를 정의한 module을 선택해라. 또는 useClass는custom provider 등록을 처리하는 유일한 방법이 아니다. 자세히
Setting roles per handler
앞의 RolesGuard는 잘 동작한다. 하지만 그렇게 smart하지는 않다. 아직 guard의 기능 들중 가장 중요한 것을 보지 않았다.(execution context). 아직 역할이나 각 핸들러에 허용된 역할에 대해 알지 못한다. 예를 들어 CatsController의 경우 다양한 route에 대해 permisstion scheme가 다르다. 일부는 오직 admin user에게만 가능할 수도 있고, 다른 것들은 everyone에게 허용될 수 있다. 어떻게 다양한 route에 대해 각각에 role를 유연하고 재사용가능하게 맞출 수 있을까?
여기서 custom metadata가 중요한 역할을 한다. 자세히 Nest는 Reflector.createDecorator static method를 통해 만들어진 decorator나 built-in @SetMetadata() decorator를 통해 custom metadata를 route handler에 붙이는 능력을 제공한다.
예를 들어, metadata를 handler에 붙여주는 Reflector.createDecorator method를 통해 @Roles() decorator를 만들었다고 가정하자. Reflector는 @nestjs/core package에서 framework에 의해 제공된다.
Roles decorator metadata를 create() method에 붙인다. 결국 admin이 있는 user만 이 route에 접근할 수 있다.
대신 Reflector#createDecorator method를 붙이면, 내장된 @SetMetadata() decorator를 사용할 수 있다. 자세히
Putting it all together
앞으로 돌아가 RolesGuard를 다시 묶어준다. 현재, request에 대해 모두 true를 반환한다. 현재 사용자가 할당받은 역할을 현재 처리 중인 route에 필요한 실제 역할과 비교하여 반환 값을 조건부로 만들고자 한다. route의 역할(custom metadata)에 접근하기 위해서, Reflector helper class를 다시 사용해야 한다.
// roles.decorator.ts
import { SetMetadata } from '@nestjs/common';

// SetMetadata(메타데이터 키, 메타데이터 값)
export const Roles = (...roles: string[]) => SetMetadata('roles', roles);

// roles.guard.ts
import { Injectable, CanActivate, ExecutionContext } from '@nestjs/common';
import { Reflector } from '@nestjs/core';
import { Roles } from './roles.decorator';

@Injectable()
export class RolesGuard implements CanActivate {
  constructor(private reflector: Reflector) {}

  // 요청이 핸들러에 접근할 수 있는지 여부를 결정한다.
  canActivate(context: ExecutionContext): boolean {
    // context.getHandler()를 통해 현재 핸들러의 메타데이터를 가져온다.
    // 메타데이터 키 'roles'에 설정된 역할들을 가져와서, 현재 요청을 보낸 사용자의 역할과 비교
    const roles = this.reflector.get('roles', context.getHandler());
    // 역할이 정의되어 있지않다면, 모두 허용한다는 의미
    if (!roles) {
      return true;
    }
    // api를 요청하는 유저의 roles과 현재 api에 지정된 roles를 비교
    const request = context.switchToHttp().getRequest();
    const user = request.user;
    return matchRoles(roles, user.roles);
  }
}

// admin.controller.ts
import { Controller, Get, UseGuards } from '@nestjs/common';
import { RolesGuard } from './roles.guard';
import { Roles } from './roles.decorator';

@Controller('admin')
@UseGuards(RolesGuard)
export class AdminController {
  @Get()
  @Roles('admin') // 'admin' 역할이 필요함을 나타내는 데코레이터
  findAll() {
    return 'This is an admin route';
  }
}
<팁!> node.js에서, authorized user를 request object에 붙이는 것은 흔한 관행이다. 즉, 위의 코드에서, request.user는 user instance와 허용된 역할을 가지고 있다고 가정하고 가져온다. app 내에서, custom authentication guard(or middleware)에서 이러한 연관을 만들 가능성이 높다. 다음 챕터에서 자세히
<주의사항!> matchRoles() 함수 내의 logic은 simple하거나 sophisticated 할 수 있다. 이 example의 포인트는 어떻게 guard가 request/response cycle에서 보여지는가 이다.
Reflection and metadata을 참고해라. endpoint에서 만일 user가 불충분한 권한으로 request 한다면, nest는 자동으로 다음과 같은 response를 보낸다.